XXXXXXXXXXXXXXXXXXXXXXXXXXXXXXXXXXXXXXXXXXXXXXXXXXXXXXXXXX
RENAULT FT 17 Bulldozer
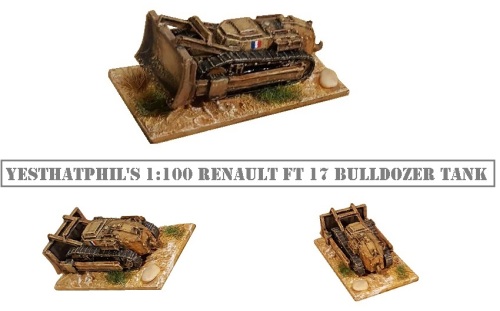
This unusual vehicle was built from card and scrap/spares on the hull of a Peter Pig Renault 17.
The spade and primary stanchions were long sidelined in the spares box from a Matchbox toy. I needed to adjust the the height and width but nevertheless chose to upcycle the ‘found’ part rather than scratch build (there is always some satisfaction in making something out an old toy component that has been gathering dust waiting for its time).

Here’s a picture of a real one …

… and here are a couple of high detail scale models which will serve as a guide in default of drawings. You will notice all three have minor differences (and where as both the models have what I assume are viewing flaps in the blade, the real one appears to be smooth … ) ..

So I’ve gone for a smooth blade but a closed driving position with hatch.

This is all done in my customary ‘rough and ready’ cut-to-fit style of modelling …
The top arms and bracings are cut from some scrap rail lines (and are simplified compared to the larger scale display models) …
 (final detailing on the Renault bulldozer)
The rough edges and missing parts are then fashioned from modelling putty.
Painted in the usual mix of layers and drybrushing, the imperfections do not really show, and the finished vehicle help the French fortify or demolish as appropriate.

XXXXXXXXXXXXXXXXXXXXXXXXXXXXXXXXXXXXXXXXXXXXXXXXXXXXXXXXXX
YA-12 Soviet WWII fast artillery tractor

Over 1,600 artillery tractors were built on the T-70’s running gear during the war but at the time of writing none were available in 15mm/1:100. Not to worry – PSC do T-70 components in kit form and these can be used with a scratchbuilt cab to make a pretty good model …

I bought a ‘reinforcement’ but as the standard box contains several you may have a spare chassis.
 (basics for the Ya-12 prepared from the Plastic Soldier Company T-70 model)
I sawed the deck off and decided to separate the radiator from the deck (as I decided it could be reused) …
Note that the drive is from the opposite end on the Ya-12 so the track assemblies need to be reversed and fixed on as level as you can get (some converting may be necessary and the backs will need filing flat to fit) …

- assemble the tub and fix the radiator to the front end.
- box in the engine … I had a white metal tilt in my spares box so used this rather build an open rear and seating.
- build the cab and 4. complete with card side and front panels ..
The engine is off set to the right and to the left there is a headlight under a flat part deck that extends into the mudguard (it has jerrycan-like detail and I suspect is a fuel tank … I used a jerrycan for it and a slice of round sprue for the headlight) …
I cut some slices off a suitable MDF window (from one of those £1 bags of windows for detailing buildings) and had intended to fix card slats to the sides to mimic the wooden construction …
 (finished model with woodwork indicated in the paint work)
However, by this stage the cab was already full width up to the mudguards so I decided just to indicate the slats with paint.
 (Ya-12 from PSC T-70 with base textured in and some drybrushing)
This was about an evening’s work … materials: T-70 chassis, tub, mudguards and radiator … canvas tilt and jerrycan from spares box … card, scrap metal and part of an MDF house window.
The model was assembled using Loctite ‘power flex’ and undercoated with Humbrol enamel. The green base is Vallejo Russian Green acrylic which has been blushed with Humbrol 80 grass green and drybrushed in Humbrol 74. The tilt is Humbrol 74 drybrushed with Vallejo white.
Add some grit and flock and spray with Humbrol acrylic matt varnish.

We mainly see this tractor towing 152mm howitzers and 85mm AA guns …


XXXXXXXXXXXXXXXXXXXXXXXXXXXXXXXXXXXXXXXXXXXXXXXXXXXXXXXXXX
17Cms K18 German Gun (Part One)

I had intended to add one of these to the Wehrmacht artillery park for some time. Then, when my Battlefront sFH18 arrived it had a spare 17Cm barrel as an option. So all I would have to do is fabricate the unwieldy gun carriage …

The sliding cradle was made from MDF base and card, the main chassis from drinks stirrers, again with card detailing. The wheels are some spare items originally from the Irregular Miniatures ‘Really Useful Guns’ range (though I slimmed them down a bit). Plus there are some hydraulic cylinders already inserted in the chassis made from aluminium tube.

I thought I would make this a 1:100 scale model – but realised, of course that I already have a fixed piece, the barrel, and really everything would have to be built around this (pretty much by eye) …

For the prominent hydraulics, I found a suitable ballpoint pen refill that would slide over my standard aluminium tube – that way I could build a big cylinder from the tube and pen refill, but carry it on my standard brass wire (giving me wire extending both ends for fitting it.) The cylinders attach to the top of the carriage (when the trunnions are carried) with a flat sort of ‘S’ strut, so the end of the wire would be flattened is my mini vice (usually how I do spear tips for my ancient warriors) … This was the only clever bit, I guess.

Pretty much there: the gun, cradle and chassis are all fixed together, I have made the main hydraulics, and an arm to carry the wheels. The gun has a round turning plate under the chassis, and I have added this from a suitably padded up penny. The back end of the chassis isn’t quite right and will be remodelled, and the struts on the hydraulic cylinders will be shortened to fit during assembly.

And here we are, glued together and fixed on a thin metal shim. The trunnions have been blobbed up a bit with Milliput to hold the hydraulic struts (which otherwise would not fix effectively, being to small and fiddly despite my best efforts) but seem to look OK.
There are a few more features to add, notably a big spring either side at the rear of the chassis, and a couple of fold up walkways either side for servicing the gun. But at this stage I can pre-paint the gun to see where I have got to – and pay attention to finding something to tow it with and some figures for a crew …
 (German 17Cms Kanone 18: scratchbuilt with a BF barrel and some Irregular wheels)
XXXXXXXXXXXXXXXXXXXXXXXXXXXXXXXXXXXXXXXXXXXXXXXXXXXXXXXXXX
German Staff car from Soviet donor …
So I wanted a ’30s/’40s style civilian/military car … and I had a potentially spare (QRF) FAI light armoured car. No problem: what I have is a car with armoured plate on it … presumably if I file the bodywork down, it’ll become a car again.
 (ignore the BF model in the background. After a bit of filling on the bonnet (hood) I make the first big cut on one of the QRF FAIs)
This is to be a soft top, so I cut off the roof, but – experimentally, maybe – try to leave the windscreen intact. For now, I am just hoping to use, maybe, the pillars, just to give strength to the final build.

I then mock the vehicle up with plasticine to get some idea where I think it is going …
I think I like it but clean the model up as I now need to do the figures and interior (which I assume will be seen to some extent)
 (more filing, some milliput – smoother than greenstuff in some uses – and some figures)
As soon as I put the figures in, I liked the look and decided this had to be a ‘top down’ model. I also decided that with the top down, it would be fine to use the screen, solid, pretty much as it emerged from the roof cut. The figures are Piggies with a head swap.
I put a floor pan in from MDF which does make the running boards look a bit weighty (but seemed right at the time and something was necessary to fill the hollow inside).
I add some headlights from carved cocktail stick – wooden – and a folded roof cut from plastic sheet – layered – and doors cut from fine card. The model is then based, primed in black Humbrol and undercoated in Vallejo Middlestone.

My correspondents on TMP have decided the original is a BMW so I paint on a blue an white badge and hold it up next to the original pic on my computer.
 (holding the emerging model up to the inspiration on my PC)
It doesn’t need to be exact, of course … I am not really trying to scale reproduce an exact copy of a vehicle I can only partly see. But for me, it has proved useful throughout to have something to be working from.
Although I have decided to go for the roof down and a Summer colour scheme, I am pleased with the similarities and I am happy that the plasticine mock up showed I could have got quite close to the original even if I decided to finish in a different way.
Certainly good enough to paint up and allocate to the Vikings to carry their staff …

In the end I am delighted with the results: it is obvious that you should be able to reverse engineer an armoured car to a staff car … but here it now is . Chopped, smoothed, crewed and finished.
XXXXXXXXXXXXXXXXXXXXXXXXXXXXXXXXXXXXXXXXXXXXXXXXXXXXXXXXXX
‘Clothesline’ Aerial
 (BF/QRF hybrid BA-20 with clothesline antenna from brass rod)
This is one of the easiest ‘complex’ modifications to do. I use 1/32″ brass rod from the modelshop (same grade as works well for replacement spears, pegging heads etc. … so all good modellers will have some 🙂 …). It bends easily and snips easily with nail clippers (my ‘discovery’ tool: so useful!) … and tightly fits an 0.8mm drill hole (yep – the modelshop sells rod in imperial measures and drills in metric … but 1/32 and .8 are a good match).
this method kind of depends on the clippers as I do do the final shortening of the stanchions in situ (as it means I don’t have to bother with correct length or drill depths): if you use pliers, you may find it hard to work close to the model, and you will find that if their is some flattening on the snip, the rod will need filing before it will fit in the .8mm hole.
So tools and materials … 1/32 brass rod, superglue (powerflex gel for me), PVA, nail clippers and pliers.
 (BA-20 step-by-step: steps 3 and 4 are fitting the antenna)
(The illustration shows cutting out the metal from the screen, inserting a head then building a card screen with hatches up – steps 1 and 2)
Then (3 and 4) for the clothesline, drill six holes at roughtly the right angle (the front pair are upright, the rear pair are at about 45 in both planes) -but you don’t need to be completely accurate as the rod will bend once it is glued in. The snip off six stanchions at a little longer than you need … and glue them in.
Once they are fixed bend and adjust to get the angles sympathetic (they look right and will meet a flat clothesline in the right places.
Next I make the antenna: hold it in the pliers and fold against the jaw to get good angles. To get the ‘D’ shaped rear I just rolled it around the handle of the pliers ‘free hand’, as it were.
In step 4 I am mocking it up to adjust (both the antenna and the stanchions) … and snip the stanchions to the right length (on the BA-20 the antenna is below the level of the MG, but above the level of the driver’s view ; it sits far enough forward to let the view hatches flip up – that does actual pretty much site it).
Rather than join on the corner, as pic 4 implies, I now (happy that all the angles are right) put and final corner in where the rod crosses, and snip both ends down so the join is in the middle of the front run. Glue it and make sure it sits flat (there will usually be some twisting somewhere that needs flattening out – or there is the way I do things!) …
Then glue glue with super glue so it sits on top of the stanchions. I then strengthen the joins by liberally coating in PVA one the superglue has fixed. My experience is that superglue plus a coat of PVA, then 2 or 3 coats of paint plus the varnish makes these strong enough. I have had to replace a Quality Castings cast metal one with brass rod because the cast one was too fragile (so far the brass ones I have done, including the replacement one, have survived multiplayer games and ‘normal’ transit calamities.

XXXXXXXXXXXXXXXXXXXXXXXXXXXXXXXXXXXXXXXXXXXXXXXXXXXXXXXXXX
Working up a Zvezda Panzer IV

I might have preferred to be discussing Zvezda’s Panzer IV on the Reviews Page – but sadly the model leaves too much to be desired – so making the best of it is a modelling project.
 I wanted a Panzer IV for the Vikings, and am generally very pleased with Zvezda models (although I know some have scale issues) so unwittingly bought a nicely-priced model where the box art shows a rear turret bin and a flat bow glacis … only to find when I had a closer look that the model shown on the back, and contained inside, is not like that. It is (like the box says) a D, a very early one which is not really suitable by the time of Barbarossa and beyond. Viking had a mix of short and long barreled IV’s so the gun would be OK, and, really, just the model on the box art would have been fine.
I assembled it at the same time as doing a Zvezda Stug … and discovered that the IV was smaller than the III which also doesn’t feel right. While I do accept that scales are always variable, I think there should be some consistency within the same range.
So I needed to widen the whole vehicle, boost up the height of the turret and generally give the vehicle a more chunky appearance. I needed to build a turret bin, shift the cupola forward and decided that I might as well go for the ‘G’ style glacis and a long gun.
I’ll not describe this process step-by-step: I work fairly intuitively and for this model most of the material was just card (an old Flames of War blister card) trimmed and glued on – and trimmed again until it looked right.
This is what that means …

(shim under turret; card turret bin smoothed in with Miliput; PP jerrycans and helmet + bits for the new barrel)
I found some useful stowage bits, and a muzzle brake that had come off a Russian 76.2mm. The new barrel is the aluminium tubing I often use which takes standard 8mm brass rod (so pin + tube + muzzle brake does the job).
I put a 2 layer card pad underneath the ‘track and running gear’ panels, widened the mudguards with strips to match, and, again, smoothed them in with Miliput …

(the finished model showing all its card and filler build up, ready to base and paint)
I must admit I was pleased with this little job: even without the paint to cover my manifold sloppiness, the beefed-up Panzer IV looked much more what I had wanted from the model.
The paint job is my usual prime/undercoat with Humbrol matt black enamel, then block out the panels with midstone Vallejo acrylic (leaving black showing in the joins and recesses). I add a ‘sand’ blush with Humbrol just to take the greeniness out of the colour, then dry brush with linen and camouflage up with some green swaths.

Zvezda Panzer IV (modified)
Some of the edges on the turret are a bit ‘soft’ so don’t really take the dry brush perfectly … but, for wargaming, this will do I think. For Germany, in Fall Blau, this is the state of the art.

For review purposes, however, I’m afraid I cannot recommend this model. It is not what is shown on the front of the box, and it is not 1:100.

XXXXXXXXXXXXXXXXXXXXXXXXXXXXXXXXXXXXXXXXXXXXXXXXXXXXXXXXXX
A Gaz-A Staff Car for the Red Army
 (inset: Gaz-A staff car – right – wading past an overloaded Zis truck)
The Gaz-A was the Red Army’s first proper staff car, and although replaced by the more modern, hard-topped M1 (the Emka), many were still in service in Finland and in the Great Patriotic War. For drawings see Engines of the Red Army …
 (overhead view of a Gaz-A marshalling at a military parade – and, inset, in showroom trim)
In adding one to my Red Army, I was fortunate in having the interior from an HO scale Ford which I could mate to the front end of a Zis truck from Zvezda. As the top picture shows, the Gaz and the front end of the Zis aren’t so different in size or style, so the job had promise.

In the picture … the basic parts … the truck parts come from the Katyusha model (so the spares box will ‘win’ 6 wheels plus the cab, rear deck and rocket gear from this conversion) … and a driver and Officer from Peter Pig. In 1., the cab floor has been cut away from the chassis so the car interior can be dropped in. I will trial line up the rear wheels before subsequently shortening the chassis. In 2., the basic assembly is done … in 3., I have added a ‘roof down’ folded roof from a Skytrex German field car (which I made with the roof up) … and in 4., I am using a pen barrel to bend some card strip into the rear mudguards.

I think the windscreen (after hollowing out) came from a PP truck for which I found something more suitable … and after patching the carcass up with green stuff, I have put on card doors.

Paint up: I have gone for the iconic 1930s style of green bodywork with black radiator, mudguards and side runners.
I had got to this stage (which I thought would mean ‘finished’) before deciding that I needed to widen the windscreen and add some spare wheels. The area between the front doors and the Engine vents just didn’t seem right so this offered a solution. I also redid the doors in order to have a pillar modelled.
The final model fits in quite nicely as a late 30s Staff Car …
 (Headquarters … the radio van in the background is converted from a Battlefront Zis truck)
having done this experimentally, I would have no qualms just going from scratch with the truck parts … you wouldn’t end up with as neat an interior as this one has (well, not without a fair amount of extra work), but a simple model would certainly be viable.
 XXXXXXXXXXXXXXXXXXXXXXXXXXXXXXXXXXXXXXXXXXXXXXXXXXXXXXXXXX
Parachutes for PBI …
 (Red Army parachutists drop from a WIP conversion TB-3 transport plane)
I can fly a plane over my battlefield easily enough, and I can place air-dropped troops and equipment on the table in its wake … but what I really wanted was a marker that looked reasonably like a parachute (so I can pace them above the table and allow them to be shot at, to drift off line etc, before replacing them with the figures) …
I had an idea that these little egg cups would work (they are an appropriate sort of size, and have a scalloped edge that is vaguely reminiscent of a parachute …):
 (raw materials: plastic sheet, coins for the bases and plastic cups for the chutes)
I’m pretty sure that they originally came from some F. Rocher Easter promotional pack (each one had a little foil wrapped choccie in it) … anyway, I kept them as they were bound to be useful for some purpose. But, clearly, they are really little parachutes, once you saw the base and stem off and turn them upside-down …

Saw the bowl off the cup. Cut out a v-shaped upright from the plastic sheet (this will hold the chute up in the air, over the base). Glue upright on the coin and glue the chute on top (Superglue ‘power flex’ for me, but everyone has their preferences). Build some terrain up around the plastic upright, and give the inside of the parachute a healthy dose of varnish. Both these should give the marker some durability. Paint.
There are all kinds of ways in which this marker is ‘wrong’ – but I am pleased … it is meant to be a marker not a model (so is supposed to be functional and a touch abstract) …
Here are some finished ones:

As you can see, I have done some variations on the theme … a soldier on one of them, a twin Soviet-style harness etc. This partly decorative, but it also means each marker can represent something different not known to the enemy player (which is part of their game function – they turn from being generic parachutes in the sky into particular teams within the platoon when the men hit the ground and form up).
Simple, cheap and they get the job done! If you recognise the cups let me know and I’ll amend the entry accordingly.
XXXXXXXXXXXXXXXXXXXXXXXXXXXXXXXXXXXXXXXXXXXXXXXXXXXXXXXXXX
Super detailing a cheap toy car …
 (new model arrives at the Timecast garage)
Chris recently acquired one of those cheap bags of crude plastic toy cars which seem to be around 15mm/1:100 scale. He gave me one on the basis that although it was a bit basic, I might be able to do something with it.
Well, as the professor shows, it is actually about the right size …

(top row: between a Quality Castings staff car and the Peter Pig Merc … together with the professor and a looter for scale; bottom row: next to the QC car and a part finished QRF Gaz jeep)
So I decided to do a full job on it to see what can be achieved. This would be more than one would generally do but it is fun to pimp an ugly duckling. The professor shows how …

(break the model into its components; find some better wheels, and build an interior from bits in the scrap box)
The wheels are Quality Castings Russian limber wheels. The seats and dash came out of toy truck: I had had to remove them to fit a driver in (but never throw things like that away).
I opted to rebuild it with the front screen only, all the other glass removed.
As you can see, I got carried away doing the interior. The model seems to be a BMW 325 so it seemed a fun challenge to paint the classic motif on the steering wheel centre.
 (glue together and prime in matt black enamel)
I could have left at at that … but decided to go for a showroom gloss red finish.
Actually that was harder than it seemed, and it took several stages to get it to a pukka auto finish …

The basic paint is Vallejo, but stage 4a sharpened it up with a glaze of Tamiya flat red (which is not any easy paint to use but is the reddest model red I know).
I did the alloy wheels in white to make them show up, and put BMW badges on the hubs. Before finishing the model I changed the panel seams at the back as they are obviously the bit that is wrong.
To fix this on a perspex base (my preference for civilian vehicles that will spend their games on roads and forecourts), we need some brass pegs in the wheels.
This was easy as the old Russian limber wheels are nowhere near as wide as modern sports wheels …

So in this case we can glue the pegs against the inside of the wheels, then fatten them up around the pegs with greenstuff (usually I have to drill into the wheels, which can sometime be tricky) … cure … trim … and paint … meanwhile drill your four holes in the perspex base.
Glue the car onto the base without making too much mess and … the job is done …

OK .. the badges fore and aft are too big (but any smaller and I’d be struggling ...) – and some will always prefer the cheap toy look of the original – but this is an example of how far you can take them if you want to …
No doubt it is soon to be blown up by stray gunfire. Wargamers will be wargamers! …
XXXXXXXXXXXXXXXXXXXXXXXXXXXXXXXXXXXXXXXXXXXXXXXXXXXXXXXXXX
Scenic hints and tips
(Timecast garage/filling station, QRF tractor, Peter Pig pumps and Skytrex tank … 15mm 1960s ..) ..
I’ve been working on the PBI urban environment recently and have enjoyed catching up on street signs, benches, buildings etc. Because you can never have enough, I have never had enough.
I did a tray full of clutter …

The signs are from Peter Pig’s Normandy scenics. I labeled them up for our Ardennes project.

The signs proved too small for me to paint properly, so I printed the names up on paper and glued them on (then varnished over to blend them in) … By experiment, I ended up making a half sized photocopy of some tests I did in 8 and 6 point – so I guess 4 and 3 point is what you want. They show up very nicely I think …

I also clustered several sign posts together to make one of those iconic German intersections …

The lamp posts and telegraph poles are railway models – and the telegraph poles had no bases. They have been waiting around for years to be turned into usable models. They are mounted on pennies and terrained-in. I’m not sure whether this is the right idea for the lamp posts (maybe they should be on ‘pavement’ bases … maybe clear perspex): I think I need to use them for a while, and if it seems they are generally not blending in, I will rebase them.

The lamp posts were green plastic, so I painted the bit inside the lens yellow which may be wrong but looks better than the green did. Otherwise, they are highlighted Panzer Grey (well, it looks OK to me) … I may have more to say about lamp posts and telegraph poles …
 (Peter Pig Filling Station furniture)
I have been experimenting with two types of ruined buildings …
A while back I made some cork shell buildings – mostly just a corner module with windows cut out and chimneys built on. I enjoyed the modelling and made quite few … but only recently sprayed them up for the second winter warfare game …


You can do quite a few of these in an evening, just with some cork tiles, a pair of strong scissors and a craft knife. Effective and inexpensive. The only pain is if you have too many windows to cut out – or want them too close together. But Warbases now make these in laser cut MDF (I like them and will do a review shortly …) …
 (Warbases ‘Stalingrad’ building after some paintwork …) …
No excuses for players not knowing where they are any more …

XXXXXXXXXXXXXXXXXXXXXXXXXXXXXXXXXXXXXXXXXXXXXXXXXXXXXXXXXX
Water and spray …

This is just a quick paragraph on an experiment that has gone well but doesn’t photograph well … white effects can be problematic.
This is one of my AK47 fast attack boats.
I’m happy enough with the transparent bases as a way of basing up boats etc. but have never been satisfied either leaving no breaking of the water – or representing spray and wash with white paint. I have successfully tried some water effect resins, but wanted something a little simpler and less ‘arty’.
Whilst I was doing the winter effect modelling, I had some snow gloop mixed up (mix water, PVA and ‘snow’ flock into a paste – for use in modelling built up snow around doors and windows) … it looks white and fluffy, so I tried it out on the speed boat.
 (before and after the spray effect)
Well, I’ll be brief – as I say, it doesn’t photograph well … the spray is a misty white blur – well that’s what I am after, and it works as a filler around the join between the boat and the base. I think the mix was about 1-to-1-to-1 (water, PVA, and snow), but I was just messing around til it looked right.
By the way, the boat is from a multi-vehicle play set from a 99p store, with a Skytrex DShK and some Peter Pig crew figures (seated WWII Germans with sailor heads I think).

XXXXXXXXXXXXXXXXXXXXXXXXXXXXXXXXXXXXXXXXXXXXXXXXXXXXXXXXXX
BA10 Scout Carrier (turretless BA10)

Turretless BA-10 scout carrier
Tidying up my Red Army recce component I followed a suggestion from The Miniatures Page and have added a converted BA10 armoured car – apparently many of these were converted to troop carriers or gun tractors by removing the turrets, and some were allocated to scout units as armoured transports.
I only found a bare few photographic references, the clearest of which was this vehicle in German service …

… but there is a limit to what ‘removing the turret and using it as a carrier’ can really mean!
Basing the model on the Zvezda BA10, the only complication is that the Zvezda turret located by a pin and boss, it doesn’t drop into a turret ring – so you need to cut the circular hole in the top of the deck – and the model has a spider brace inside – which you will need to trim to fit your troops in (alternatively you might trim the figures … I did a bit of both).
I cut the circle quite fairly and accurately … although, when I added the figures, the opening was no longer visible … so cutting it accurately might be a waste of effort … I also pre-painted some bits just in case there might be an advantage.

The figures are some Battlefront (Germans, in fact) from my junk box, with some Peter Pig spare heads. Additionally, I added a Peter Pig PTRD AT Rifle and some BF stowage.
This was a quick way to add something different to the force and looks splendid in a standard paint job.
I treat it as recce in NQM/Megablitz, and as an armour 5/GE 5 armoured car (with DP and ATR) in PBI.

Turretless BA10
XXXXXXXXXXXXXXXXXXXXXXXXXXXXXXXXXXXXXXXXXXXXXXXXXXXXXXXXXX
Preparing and Painting Red Army Tanks …

Zvezda’s KV-1 model 1939
The Zvezda KV-1 has been around a while and looks pretty bland. Actually it is a very nice model, and looks the part after a quick paint job. It is sufficiently simple that I chose it to take a few pictures and record my standard process.
Preparation
Just a few things need to be done in this case, prep the base, paint the tracks and fill the tub with plasticine to give the model some weight. All well worth doing before staring the paint process proper …

Enthusiasts will divide over basing tanks (historical wargamers tend to base them, ex GW and railway modellers don’t … ‘minis gamers’ are all over the place) but basing them is best. I shim up under where the tracks will go (so they don’t end up buried in the basing material) and I pre-landscape the bit underneath the tank (as it is simple to do at this stage, but a pain to do later – and, often, bits you can’t reach later show up!) …
On this model, there are wide tracks which are visible in a small gap under the track guards. Again, super simple to paint now, but tricky later. I also paint the underside and the reverse of the wheels etc. but unless I suspect they will show, I tend to leave them black.
Dummy fit the hull and deck to get a feel for where the ‘waterline’ is, then top with plasticine. Another prep which only takes seconds, but where you will appreciate that chunky feel later (well, I do, anyway) ..
I glue the components together.
Painting and basing …

Russian armour step-by-step
So … glue the tank down and finish the filler … undercoat the tank black and the finish the ground colour on the base. For durability, I do the undercoat and base in Humbrol matt enamels … I have never found any need to wash plastics when using solvent based enamels (the solvent gives it plenty of bite). If only doing a few models, stick them on the radiator while you make a coffee (that is usually enough to ensure the enamel is thoroughly dry) …
Paint 2: Vallejo acrylic Russian green dry brush paint the tank, roughly leaving black showing around the details to give a bit of depth. Acrylic over enamel is a very strong combination.
Paint 3: I apply a blush of Humbrol Grass Green on Russian vehicles which livens it all up a bit. What colour is Russian WWII armour? Well, as far as I can tell, quite a few different shades – this technique works for me and is pretty quick. I should add that in most normal lighting, it doesn’t look quite as green as in the staged photos …
(NB with something like Panzer Grey, this phase would be a second dry brush with lightened Vallejo Panzer Grey)
Paint 4: a light, brisk, dry brush with Humbrol Linen to highlight the corners and raised details. I prefer enamel to acrylic for the final dry brush as it stays stickier for longer in the brush. I don’t mind the solvent smell, so there is no downside… On this stony base colour, the Linen is a good highlight for that, too … so it’s an ‘all over’ brushing.
Finally, I spray matt varnish. I find the Humbrol aerosol stuff reliable, very matt and you hardly need any to get the finish.

Job done!
As noted, there is nothing spectacular about this KV model (which is why I chose it for the demo): but I think the simple 4 stage job shows it off OK. I may add some slogans and those one or two markings Soviet vehicles had as and when I’m organising the kit for a big, set-piece game.
XXXXXXXXXXXXXXXXXXXXXXXXXXXXXXXXXXXXXXXXXXXXXXXXXXXXXXXXXX
 Pol Column – homage to NQM Chris …
Visitors to Chris K’s NQM blog will have seen his imaginative recycling of the cake decoration loco as a fuel tanker (by adding bogies from an ’88!) – it is ingenious and fun (NQM blog trains to tankers)…
Of course, Chris K’s inventions are too left field for me – but applying the same principal to a Zvezda Opel Blitz gives you something quite plausible for not much effort.

Back, in pink: Chris’s tanker in construction – front: my Opel copy
Not that I’m saying such a tanker actually existed (it may have, though most wartime German tankers seem to have been oval sectioned, fully or partially enclosed ..) – but I think it gives a plausible impression.
POL, of course, is key to operational wargames in the mechanised age – being the sinew peculiar to the armoured divisions (so, although many fuel and lubricant shipments would have been in drums on flat trucks, the occasional tanker makes the sort of log being carried more explicit)

ersatzbenzintankwagen
What’s all this about a cake decoration train? I found some for £1 in the bakery dept. and they offer 24 wheels … and 5 carriages that can be made into Gipsy-style wagons/ambulances etc. (but, unless to opt to use the train as a train – at about 10mm scale, since you ask! – the locomotive will sit on one side without a purpose … or would have …)
Thanks for the inspiration, Chris.
XXXXXXXXXXXXXXXXXXXXXXXXXXXXXXXXXXXXXXXXXXXXXXXXXXXXXXXXXX
Head Swaps
This topic comes up quite regularly and I usually pass over, clarifying that it is simple and quick, requires no special skills, and means you can restyle your figures however you like with no issues.
However, people still ask, so here is a longhand ‘it is simple’ together with some pictures to help things along.
Peter Pig make a growing extensive range of alternative heads (range 6), so the answer to how do I find a figure x but with ‘y type’ headgear, is … buy the appropriate figure, then select your chosen headgear and swap them on.
Here I swap colonial style sun hats onto a unit of WWI Germans to make some generic early/mid 20th Century Europeans fighting in Africa …
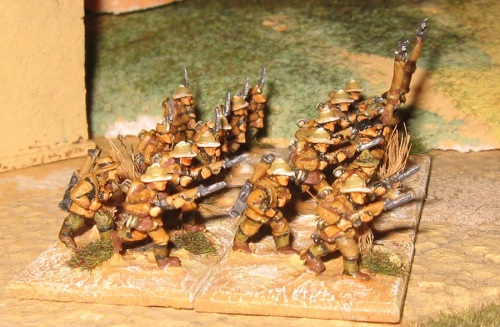
All the heads have been changed … Including the supporting bases and alternates, there are a few caps and isabelinas, and 31 of the sun hats. The heads swap phase was less than a single evening (so a fraction of the total project time). The only ‘specialised’ tools are the clippers, pointed flat file and the pin-vice drill.

Even this is above the minimum. But I have a lot of tools. Martin at PP recommends you just twist the existing head off, mark the hole, drill it with a 1 or 1.2mm bit (pin-vice, not power tool: power tools generally spin too quickly for soft metal), then trim and insert. Here’s what I do …

- clip the head off with nail clippers. I use clippers because the usually fit nicely around the neck and give a clean cut which will allow me the recycle the spare head. NB If the brim is too wide it might get bent in the clipping, in which case a knife is preferable.
- mark the drilling point with the tip of a craft knife or the spike of a compass etc.
- drill down a few millimetres. I use a 0.8mm drill, then ‘flare’ it with a twist of my file – it gives a nice tight fit (but you might prefer Martin’s easier fit using a bigger hole*)
- flare it by twizzling the tip of my pointed flat file in the hole.
- snip the neck/spigot of the replacement head down to a length suitable to the depth of the locating hole (I snip at an angle, making it sort of pointy … if you opt for a comfortably sized hole, this is probably unnecessary – but it helps with my tight fitting hole)
- glue in with decent quality super glue (important note on what this picture shows you: the pic is not retouched and is typical – there is seldom any need for filler around these head swaps
… and repeat 30-odd times until the unit is done. I usually snip, drill and glue 4 or 5 at a time so as not to end up with too many bits and pieces all over the place, but I don’t think there needs to be a recommended method.

Here’s our victim with all his head swap buddies around him …

… and here they all are after a lick or two of paint …

… and here’s a motorcycle scout pulling a wheelie …
There’s a quick profile of these Colonial soldiers on the main page: Generic Colonial Infantry

*0.8 is the right size for the brass wire I commonly use, so is always in my pin-vice … I find ‘tight plus a twizzle’ less bother than swapping drills – so it has become my usual and preferred method. I guess that indicates how quick and trouble-free the procedure is.
XXXXXXXXXXXXXXXXXXXXXXXXXXXXXXXXXXXXXXXXXXXXXXXXXXXXXXXXXX
 (left: the Matchbox interloper; right: a Battlefront SU-57)
Die casts to wargames models … recycling on old treasure
This battered old Matchbox half track was the first military vehicle I bought. It is closest to 1:87/Minitanks in scale, so last saw service back in the 1970s (1976, I think, in the School wargames club’s Founder’s Day ‘Battle of the Bulge’ display): too big for 15s and too small for 20s, it has been lost for over 2 decades.
I found it recently and discovered it to be useless (the rubber track bands were perished) and of negligible value (it isn’t a ‘rare’ one, is heavily worn, and as said, the tracks are gone, making it worth less tham £1.00). So I decided to put it back into service with a ‘cut’n’shut’ to 15mm. Purely for nostalgic reasons (it was quite a bit of work, but was an intriguing challenge and it means an old warhorse can be revitalised and working the table again).
Using the techniques I have learned, hopefully nobody will notice until it is pointed out that the model is an out-dated old die-cast in the wrong scale. It is camouflage and surgery.
 The width was moderated by a combination of cutting (chop out the middle) and filing. In this case I decided that all I needed was to reprofile the cab, trim the big wide mudguards and the only actual cut down would be the back.
With the screen armour added in the ‘up’ position (which seems normal for these GMCs), some pre-painted crew added plus putty and junk, the illusions were beginning to convince.

It was time to build the Maxson motorised quad AA mount to go in the back. Given my plan to run this model as a Lend-Lease Soviet alongside a T48/SU-57, I scrapped a scratch built quad layout in favour of recycling the spares from a Battlefront model. My layout was more accurate, I don’t doubt, but the plan here was masquerade.
BF‘s M16 comes with optional twin or quad gun layouts. I took the spare (quad) components, then built the Maxson turret out of an old pen top and some card.
 (with a Peter Pig Ushanka head and some Green Stuff added to achieve the shape, I was happy)
So, the model was a stripped 1960s Matchbox. The added spares were the front roller, some tracks (available as ‘special order’ from Battlefront), the paired 50 cals from the M16 pack, some boxes and junk from Under the Bed, and the crew figures (BF with PP Ushanka heads) … the rest was card and Green Stuff.

Battlefront and Matchbox …
I’m pleased this can now slip in, un-noticed, amongst the truer 1:100 modern toys from Peter Pig, Battlefront, Skytrex, Zvezda etc. that make up my Red Army. If it still looks like an old Matchbox toy from a junk box, I have failed in this entertaining mission.
But I think, with a will, you can turn anything into anything.

M17 MGMC quad 50 cal in Red Army service
Another little tick in a long outstanding box.
NB, I put one of the plastic Battlefront 30 cals on the front (as these are often shown) – the pathetic plastic barrel didn’t even survive the build process (it snapped, so I had to drill a hole and graft in a metal barrel!): ‘hard’ plastic is nearly useless for small parts on wargames toys. However manufacturers deal with high metal prices I hope the use of plastic is restricted to the big heavy components. PSC products may be popular with the chattering classes – but if those chatterers actually wargame, my guess is there’ll be a lot of comment about breakages over the months to come.
*M17 … the International Harvesters version of the M16, according to this site, 1,000 were sent to the Soviet Union under Lend Lease to help solve the Red Army’s lack of a mobile armoured AA platform.
XXXXXXXXXXXXXXXXXXXXXXXXXXXXXXXXXXXXXXXXXXXXXXXXXXXXXXXXXX
Another option for windscreens – as used in this Kfz 21
Another way of dealing with the open or solid windows dilemma is to glaze the windscreen/windows with clear plastic sheet.
 This ‘posher’ transport is basically the Skytrex Field Car with the sides and rear re-modelled (with a saw, a file and some miliput). The original model comes with a choice of open or ‘roof up’ – the roof being a solid piece comprising the tilt and all windows cast in.
I have sawn the roof free of its windows and replaced the screen with plastic sheet. The side pillars were modelled on with miliput to finish the job. I confess the height of the passenger compartment is probably a millimetre or so too tall …

A Staff Car belonging to Von Kleist’s First Panzer Army (Army Group A)
… I’m not quite sure where in the modelling process the tallness crept in – and I may go back and correct the problem. But I’m pleased enough with the model to be satisfied for now.
We have very few Staff Cars available in this scale – so adapting what is around is a necessary function.
XXXXXXXXXXXXXXXXXXXXXXXXXXXXXXXXXXXXXXXXXXXXXXXXXXXXXXXXXX
Super detailing the Zis-5
 In the last of these little features, I address the two main issues with the basic Zvezda Red Army truck …. it has filled-in windows and there is no boarding effect on the modelling of the cargo bed.
The windows detailing is easy enough with semi-soft plastic, and the openings can be cut with a craft knife. This can be made easier to do and to control by drilling pilot holes in the corners. It should then be easy enough to cut between the corners with a sharp blade.

1: drill pilot holes in the corners of the windows; 2: remove windows with a craft knife starting with the most awkward; 3: I found it easiest to cut down through the false top, leaving just the glazing bars; 4: I also removed the minimal detailing on the cargo bed ready for planking later.
In fig. 1 the left hand hole was drilled with a pin vice, the right hand with an electric drill. I can’t imagine anyone wargaming in 15mm and not having the former. It is more accurate than the electric drill, and is right for most metal figure tasks. As this material is plastic, an electric will be much quicker and is what I used after these demo holes. You can even use it as a cutting tool as it goes through the plastic like butter. You will have to keep cleaning the melt debris off the bit, of course (and remember the holes keep getting bigger as the debris builds) …
Stages 1 to 3 probably take 30 minutes or so … that said, I’m impatient with these things and do make mistakes!

As Zvezda do actually model the engine in this kit (and the engine cover on the model is a stupid snap and bend design which never really works) I decided to make a little feature of it by modelling the cover folded up for inspection.
Tackling the blandness of the cargo bed, I decided the quickest solution was to trim the minimal detail back to flat, then plank it out using thin card as I had done for ‘trucks from trash’. It is a quick way of getting quite a good effect.

Again, I sort of ‘wing it’ with this kind of task and just chop quickly and by eye – doing plenty of extra strips as I know some of them will be rejects. You may want to work more accurately – but it isn’t worth making it a labour of love. I took about 30 minutes again, and I think it doesn’t look too slapdash …

So the super detailing added about an hour to the build time (but I’m pleased with the results) …
The black undercoat and some of the green paint was done before basing the model (in order to get at the underside etc.), then as usual it was fixed on some shims under the wheels so they would sit on the landscaping not ‘in’ it.

(super detailed 1:100 Zvezda Zis-5)
I put that little FoW Soviet Artillery fellow there as he sort of looks like he might be fixing the engine. There are two tones of acrylic green brushed over the black undercoat and a rough dry brush of Humbrol linen. Another random Soviet green!
This model will go into the Megablitz/NQM transport pool.
XXXXXXXXXXXXXXXXXXXXXXXXXXXXXXXXXXXXXXXXXXXXXXXXXXXXXXXXXX
The second makeover of a Zvezda 1:100 truck …
 GAZ TK/76mm RCL SP …
Made from the Zvezda Katyusha snap together model after the launcher rails etc. were robbed for another project.
The RCL itself is a modified spare from PP’s AK47 range.


(photo from the armchair general site)
I very quickly mashed a mock-up together with a spare piece of soft top (left over from a Skytrex German field car which I had modelled with the top down) – but it was immediately obvious that the wheelbase needed to be shortened (the TK on which the original was based is much smaller than a Zis truck).
Also after further examination of the drawings, it dawned on me that the rear axles are single wheeled, not twins … and so the mudguards are also narrower. The shape of the soft top needed remodelling too.
Indeed, the whole thing was going to require more chopping and grafting than I’d thought.

(above: the mocked-up version confirmed my thoughts that this conversion would work … below: what I actually had to do to make the model)
The nice wire wheels are spares from the Peter Pig Russian 37/45mm AT gun. I used my drill to get a crude similarity of appearance into the rear wheels. It would have been smarter to have acquired some more of the PP ones but I am always a bit impatient once I get started on these jobs.
I also left off the spare wheels that tuck in behind the front mud guards. I just like the look of the vehicle with the engine cover unmasked (and anyway there are the other spares on the top to be going with …)
Indeed I have to confess I should probably have sawn carefuly through to slim down the rear mudguards. Actually I just heated up my craft knife and sliced straight through (and the white milliput in the picture above shows that this method sometimes leads to additional finishing work: nevertheless the slimming down only took a few seconds 🙂 …)
There are more reference pictures of the Gaz TK on the useful Engines of the Red Army site, of course.

(the completed Gaz TK SPK model)
I have to own up I really like this one. A genuinely interesting vehicle and a neat little model.
After I compared the mock up with the drawings (and realised it was a tricky one) I thought I had bitten off too much. But a bit of modelling putty and a coat of paint works wonders I think.
 I set this little vignette up as a wry take on the Red Army in 1939 … the RCL ‘technical’ alongside horsedrawn supplies and communication by megaphone! What Chris Kemp would call … not quite mechanised!
XXXXXXXXXXXXXXXXXXXXXXXXXXXXXXXXXXXXXXXXXXXXXXXXXXXXXXXXXX
Zis-5 (BZ) fuel truck
I did promise some truck conversions based on the Zvezdas, and the first to roll out of the workshop is what cooler kids might call a ‘kit-bash’. Although most Red Army fuel was transfered into drums at the rail head, tankers were also used including the BZ. (Engines of the Red Army link).
Rather than scratch build the tank, I have mated the Zvezda truck with the QRF Gaz 66 vessel.

Here’s a QRF Gaz 66 from my AK47 collection in case you need a reminder …
") (Gaz 66 fuel truck by QRF)
(Gaz 66 fuel truck by QRF)
The mating up is fairly straightforward, though I had to take a few mms out of the tank to get the length right (and a purist might quibble the width too) – but I still think the Gaz version is close enough to make this a better approach than a complete new build.
 (the white filler shows where the surgery has happened and been blended in)
There’s a bit of creative modelling to do at the back … the hoses come from scrap from a ‘poundshop’ toy tanker, but the outlet plumbing is built from bent metal and filler. I’m pleased it is convincing from a distance. The hatches are again plastic scrap.
 (rear view: based up and modelling completed. I have washed it over in Humbrol gunmetal at this stage as a primer)
I will take out the moulded-in windows in the next Zvezda truck … that would be my prefered style, but with this project I wanted to keep the truck model pretty much as is.
The paint job came out very green. I suspect normal RKKA grenn would be paler than this but would have varied a lot (so this will be one of the greener ones!)
I decided not to clutter it with as much junk as the originals

But I think there are enough similarities (15mm Zis-5 BZ fuel truck by Phil from Zvezda and QRF components)
XXXXXXXXXXXXXXXXXXXXXXXXXXXXXXXXXXXXXXXXXXXXXXXXXXXXXXXXXX
Nifty artillery bases

AK47 105 gun unit components
For quite some while I dithered about artillery bases: I quite like the model appeal of an independent tow base and crew base, each with a space for the gun which was modelled loose and fitted onto either as appropriate. I found that much more appropriate than towing a permanently deployed gun base behind a loose tow (as was my norm) … although these things fade in significance when you start any game, of course.
Two things annoy … the floating gun, rattling around in the transit box, getting lost etc. was always a pain. Also, often extra long tow bases just didn’t look right parked up behind the guns once the unit went into action.
Now I use magnabase.
 I mount the guns and tows on metal sheet (I recycle mine by chopping up free biscuit tin, but you can buy sheet from your model shop if you prefer), and make textured-in sabot and deployed crew bases with magnabase patches fixed on where the gun will go.

The gun and the tow come off the sabot when deployed, giving a nicely modeled deployed gun and a vehicle-sized vehicle base to go behind or be driven away as appropriate.

deployed 105mm gun unit
Nothing goes missing in the boxes, falls off and gets damaged in play etc. I like this neat, cheap and easy to make solution and commend it to you. The medium grip afforded by the magnabase and the metal shims is just enough to make all the annoyances go away. Additionally, fixed down on their own shim bases, the guns are more robust than they are loose. No broken wheels or bent trails to worry about.
In the case of that truck, I have grafted a magnabase patch into the flat-bed so one of the guns is carried as a load. The truck can, of course be used for other loads (which can also be mounted on metal shims for additional versatility) …
Also …


Some WW2 German light guns

XXXXXXXXXXXXXXXXXXXXXXXXXXXXXXXXXXXXXXXXXXXXXXXXXXXXXXXXXX
TRUCKS FROM TRASH

Some Log for 22 Panzer Div.
Well, not really trash, of course … stuff from the junk box that wasn’t being used. I needed some logistical lift for 22nd Panzer, and looked around for German heavy trucks. In 15mm, all I could find were Opel Blitzes, otherwise foreign trucks (and most of them light trucks also). On the other hand, in the aforementioned junk box, I had some tilts from the QRF Dodge truck, a radiator grille from an N guage car and a few more of those ‘Cake Decoration’ wheels last used on the Garford-Pultilov.
I had always known that (with a bit of effort) that was a truck … and recently buckled down to doing the job.
The build was relatively straightforward – some MDF components were linked together with brass wire to to make the two chassis, the wheels were pinned from underneath, and the tilts glued on with some shims to get the height right (and some card on the underside as the bed). I then just needed to add some decoration and a cab. The cab benefits from an old ‘minitanks’ jeep tilt (the jeep is long departed) which was ideal after some adjustment, the screen is sawn off the enclosed option for the Skytrex KFZ16 field car, the rest was made from card and finished with miliput. The mudguards are sliced from an appropriately sized old pen barrel. I never got round to adding the front bumper or lights – although there are photos of some examples without such niceties, I’m sure I will get round to it one day.
I think the success story is really the planking that was added from card strips all round below the canvasses … and inevitably, although some due care was taken, this was really the easiest part of the whole build. It makes the model look a little less like a jumble of bits from my junk box.
Overall, I was surprised by how easy this job was, and am pleased with the results.
XXXXXXXXXXXXXXXXXXXXXXXXXXXXXXXXXXXXXXXXXXXXXXXXXXXXXXXXXX
AS SEEN IN ISSUE 239 of NUGGET
15mm Garford-Putilov scratchbuild
The background is simple. Graham E wanted this magnificent beast for his RCW collection and couldn’t find one. He got a Paper Panzers download (1:76) and re-scaled it to 1:100. Then had some concerns as it looked a bit fiddly. Well, I’m usually the guy for ‘fiddly’, so I volunteered to have a go at it.
Then I got cold feet.
I think paper/card modelling is probably a hobby in its own right (it follows its own logic: I wouldn’t use rolled-up paper for axles … but then I’m not a paper/card modeller), so it does some stuff in ways that seem counter-intuitive. Second, frankly, the model clearly was fiddly, but optimised at 1:76, re-scaled to 1:100 some things were just too small and for a 1:100 model I’m sure would have been done differently.
More than anything, however, I was not convinced that printed card wheels and rolled paper MGs would ever look anything other than that. It needed proper wheels and guns, and needed to be a robust solid wargames model. I would scratchbuild it using the Paper Panzer ‘net’ as a guide.
Wheels: these were always the problem, and are the key to any good vehicle model. The Garford wheels are quite characteristic and really need to be built from scratch. In fact they are the only ‘borrowed’ bits in the model. I knew Graham would never permit that degree of custom effort so I had to find something ‘near enough’ (if anyone ever want to commission a Garford master from me, I’ll build some pukka ones). The nearest and cheapest are some (notionally railway) wheels I found in this plastic cake decorations pack. The £1 pack has 24 wheels in it, and they look pretty good for all sorts of spoked wheels. They have helped make this FoW Russian truck look more ramshackle, I think.

plastic cake decoration wheels
So, that decided, I set about building up a solid wargamerly tub. In this case some MDF base off-cuts, just to get the basic shape. MDF is a good material for this of course, as it is easy to drill and peg into later. And I have lots of it lying around (I use for basing) ..

basic carpentry
All these basic components were cut to scale drawings and/or the Paper Tiger design (so whatever happens, the basic size/shape/width/height will be within sensible tolerances: closer to accurate than many figure ranges, that’s for sure) … Scale drawings of the Garford are quite easy to find on the internet. Most are 1:76, but just measure up on them and then convert to 1:100.
Some attention was given to the chain drive to the rear wheels which such a characteristic of this vehicle.

chassis, wheels and drive
Then the basic body shell was built up. At this stage, the body was given a mix of sanding and miliputting, and the Garford-Putilov is starting to emerge.

completing the body shell
The turret platform was cut from tin sheet, pegged and mated up with some magnabase on the gun platform. This is done ‘just because we can’ (a piece of steel sheet and some magnetic strip is one of the easiest ways to have a swiveling turret that isn’t always falling off, and as we need to cut a base for the turret, we may as well cut it from metal and that means we are half way there)

locating and fixing the magnetic turret
I also painted it green at this stage. Partly this meant it was possible to use the vehicle to test the rules for it, if required. Partly it is because from this point on, the build is cosmetic and more intuitive. The weapons will be added, plus panels, hatches, rivets etc. but all, now, to get the finished look right.
The rear wheels come off for twinning, and the various pieces of rod and tubing are cut so I can make up the various weapons (3 maxims and an infantry gun). The front machine guns rotate in sponsons … again made of tubing (fix these over lugs during assembly and they would be movable. On this model they are glued as Graham wanted fewer moving parts on the finished model).

At a technical level, that completed the Garford Putilov.
The final phase is mostly aesthetic. Additional panels are now applied from thin sheet (thin modeller’s metal sheet is perfect for this, but plastic will also work) – this will hopefully give a nice flat and flush finish to the complex multi-angled shape of the Garford. Door and hatches are added (in this case, for speed, I used thin card), and hinges, rails and handles cut and shaped from brass rod. All these details are grossly overscaled to match the ’15mm wargames’ style (and I then black outline them before the final paint job – again, to help define the vehicle’s characteristic shape)

And, lastly, I ran some rivets along the key panel joints. Again, grossly exaggerated, and entirely to get the final look. There is no attempt to get the right number or size (in this scale you would end up not being able to see them): the intention is to get that riveted together from boiler plate look.
I have done this a number of different ways (including ‘pin ends’), but for simplicity, on this model I tried ‘PVA blobs’ … apply a little blob, and when it dries blob again until you build up a little hard lump. This worked better than I expected, and the lumps are naturally rounded. Doing quite a few, by the time you’re done, the first ones are dry enough to take another blob. And so forth until you are happy with the effect. As they dry, the shrink and flatten a bit – but not much. Those on this model are triple blobs (any more and I’d have got bored …) but I’m pleased with the final effect (much better than not bothering, I think).
 So – top coat and dry brush … and deliver in time for COW.
The finished models have a tinted varnish liberally applied (a bit too smeary, I think – sorry for that) to match Graham’s other RCW vehicles. Now … please don’t blow them up on first contact …
Actually, blowing them apart is quite hard to do in Return to the River Don … so when they go on the table they’ll probably hang around scaring everyone for quite a while. A very enjoyable project …
For more on Return to the River Don, try Graham’s Wargaming for Grown Ups ..
The Nugget is the journal of Wargame Developments …

Garford Putilov Armoured Car


[…] Modelling […]
[…] Modelling […]
[…] Modelling […]
[…] Modelling […]
[…] Modelling […]
[…] Modelling […]
[…] by Phil Steele’s Zis-5 (BZ) Tanker conversion, I did some enthusiastic rummaging around in my bits boxes (Suzanne calls it “the […]
[…] Modelling […]
[…] Modelling […]
[…] Modelling […]
[…] Modelling […]
[…] Modelling […]
[…] Modelling […]
Love the Gaz – A …. it’s an inspired answer to the lack of cheap later stuff, and it looks suitably not-fit-for -purpose in the way that soviet trucks of the era do :O)
Regards, Chris
[…] Modelling […]
[…] Modelling […]
[…] Modelling […]
Hi there
Excellent someone else spotted the Matchbox half-tracks look like they could be 1/100th scale and did something about it . I pick them up from toy fairs/car boots especially if 50p ! None have tracks however I am sure at this scale I can fudge the tracks with a couple of wraps of cardboard.
However I am a little confused with your description :-
The width was moderated by a combination of cutting (chop out the middle) and filing. In this case I decided that all I needed was to reprofile the cab, trim the big wide mudguards and the only actual cut down would be the back.
Did you actually cut out the middle ? if so which middle ?
Did you cut the back off ? where/how ?
I also though it should be relatively easy to chop one into a M2 scout car ?
regards Paul
ps not hung up on rivet counting as long as they look the part from 2 ft I am happy !
[…] Modelling […]
[…] Modelling […]