**************************************************************************************
15mm Russian Trucks …
Some while back I conceived of the idea to review what you can get in this scale by way of Russian Trucks.

Initially, there had not been much choice but of late first Zvezda entered the market, then Peter Pig went to resin and most recently, Butler added their Printed Models.
In the line up we have a mix of Gaz and (the larger) Zis trucks and I have included one or two of the variants – quad Maxim, Katyusha, radio truck – (because the truck underneath is the same). With most, there is a choice of the 6 wheeler or the 10 wheeler* (and in many applications the configurations were interchangable) …
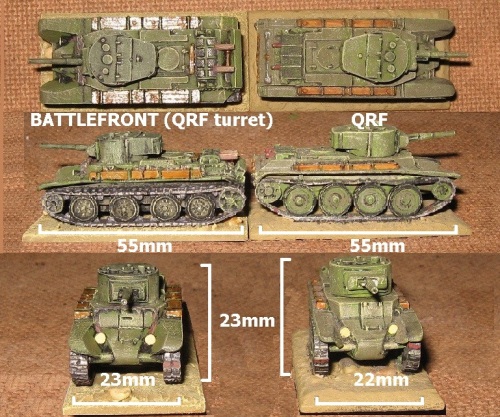
Let’s compare them for size (accepting that the Gaz trucks should be smaller):

 The Gaz trucks are in the middle, significantly shorter, although the QRF is an older, quite rough casting, and the Skytrex truck looks a bit ‘pumped up’ almost like a hotrod. The Quality Castings truck is the smallest and is more the traditional 15mm scale than the modern 1:100 scale. QC aren’t that easy to source in the UK and the company may well have replace these older models with 1:100 scale examples (as has happened eslewhere within the ranges).
Battlefront (Flames of War) come either as resin markers or resin and metal models.
Price: at the time of writing …

There are some obvious conclusions: the Battlefront Resin/metal version is overpriced at £13 for 2 models as is the Quality Castings metal model at $10 (although that will depend somewhat on exchange rates). Easily the best value is the new contender, Butlers Printed Models. For solid metals, QRF are great value at £4.00 (basically the same price as their plastic and resin equivalents).
 (15mm Russian Trucks: how they measure up)
Dimensions*
 *length is arguable. I have had to ignore bumbers as not all examples in the review have them. The internet sourced dimensions for the actual vehicles (in both cases longer than all the models) I am sure includes all extremities. Peter Pig is probably the closest, scale-wise to the actual Gaz AA, Battlefront, probably, to the Zis-5.
Wheels …
The *all resin* models are filled in around the wheels. I’m not a big fan of this style but it comes with how the resin models are cast. You can saw the infill from around the wheels but it is delicate and time-consuming work which most enthusiasts won’t want to do.
Of the others, all have separate wheels except the Skytrex Gaz which are cast on. Ostensibly a bonus, this has been done with so much back fill that they would have been better separate. The Zvezda wheels are all individual and a pain to clip together … but look lovely when complete. The QRF trucks come with the rear axles and wheels all cast as one part which makes for easy robust assembly. The Battlefront resin/metal model has a separate axle and a twin-wheel part to glue on each end.
 (Gaz AA and GaZ AAA from Peter Pig)
The cabs …
The Skytrex and metal/resin Battlefront models have hollow cabs with open windows (the Skytrex one without a driver model), the Zvezda model has a hollow cab but solid windows … and the rest all have solid cabs. We all have our preferences (I prefer open hollow cabs with open windows allowing you to see into/through the vehicle).
Being a hollow, softish plastic box means that, with the Zvezda model, the windows can be opened up relatively easily with a sharp knife. On the resin and solid metal (QRF) ones this would be more troublesome.
 (Zvezda models with the windows opened up – in the Winter version, I have added some glazing from thin plastic )
If you are very careful you can leave the glazing bars in situ as you cut out the glass. Although you will need some patience and skill. I generally drill some pilot holes in the corners then join them up with cuts.
Of course, you can saw through the metal ones, although you will need to to shim up to relace the half a mil or so that gets lost to the saw Below are 2 QRF Gaz trucks that have been radically tidied up and modified …
Both have had a lot of work on the mudguards and new wheels (the fronts from Peter Pig, the rear sets from the Zvezda Zis 5) … I think there’s a splendid little model in there but it takes a bit of work and a bit of borrowing to get it out.

In the second example I have sawn out the solid metal cab and added a *head and shoulders* driver (as well as a Zvezda grille and whole lot of soldiers in the back). It can be done.
 (Gaz truck: cab and chassis by QRF; grille and rear wheels by Zvezda; front wheels and men by Peter Pig; cab roof and cargo bed by Battlefront)
I think it one of the nicest models of the lot and kind of captures the jalopy character of the Gaz AA. But it is a long way from ‘straight out of the box’. With more choice, now, I think the QRF is great value but just too much work.
Skytrex (as of late 2019) has lowered prices, so their Gaz truck isn’t badly priced for an *all metal* offering. That said the mudguards are a little too extravagant and the wheels will all have to come off to get rid of all that surplus metal.

So it’s an interesting quirky model but there’s just too much work …
So Zvezda‘s simple to clip together and easily converted kit looked a likely winner from the start. But then along came Peter Pig’s resin version – a chunky little contender with no assemby required – and Butler’s Printed Gaz Truck – neat and accurate, quick delivery and beating everyone else on price by some margin.
For size an accuracy, the Butler’s model is spot on and I like it’s simplicity – unlike the other Gaz trucks it is a later type with cheap angular mudguards and only one headlight. For me the 3D casting process is the limitation: I really don’t like the striations you get from the layering process of the printer (I am sure this is simply down to the process and the next generation will have all the advantages plus smooth curves) … anyway, at present sloping and rounded surfaces come out ridged and sanding has proved quite tricky …
 (Butlers Printed Models: close up showing the printing striations laying the engine cover)
I think the best answer may be just to fit a thin plastic lid over the bonnet (possibly borrowed from the Zvezda model) but filler might work. I have yet to try sawing open cab. Again, for me, potentially the best and certainly the best value – but maybe too much work.
Somehow I don’t feel the same way about the Piggie … excellent value at £4 and no assembly required. What it lacks in model qualities (it is basically a resin block with the truck’s shapes and details moulded on) it seems to compensate for in character and durability.
 (Peter Pig’s resin Gaz AA truck in winter camo)
Again, I will get round to doing a cut-away version to placate the modeller in me but, for some reason, this one seems to work for me ‘straight out of the box’. I think if I was starting from scratch I’d probably make this my basic Russian truck.
But in the end, comparing chalk with chalk, I think the Zvezda model remains the pick of the review. You do need 5 minutes or so to clip it together (and you do need to take care with the wheels and suspension) but the edge that it has over its rivals is that it is much easier to convert and adapt to all the other variants – and to change/interchange parts.
Summary …
QRF … I think these models are now outdated and need to be remastered. Despite good value for metal models, I think there is just too much tidying up to do. The Zis is a lot better than the Gaz.
Quality Castings … nice but expensive – and slightly under-sized by current 1:100 standards.
Battlefront … I’ve always prefered the traditional resin/metal model to the resin block but these days it is clearly too expensive.
Skytrex … middle value and characterful metal model let down by the ugly way they have done the cast-on wheels.
BPM … excellent model and excellent value let down by the limitations of the 3D printing technology.
Peter Pig … bang on the market price for a resin model and likeable despite the limitations of resin casting.
Zvezda … good value and adaptable. Clips together in a few minutes, looks good … easy to detail and adapt.
 (Zis-10 tractor: a modified Zvezda Zis-5 )
* curently the BPM Gaz is only available as a single rear axle (AA) model, and for the twin rear axle fom Zvezda, you need the Katyusha rather than the truck sprue.
**************************************************************************************
Revell 1:1200 Italian battleship (Roma) plastic kit
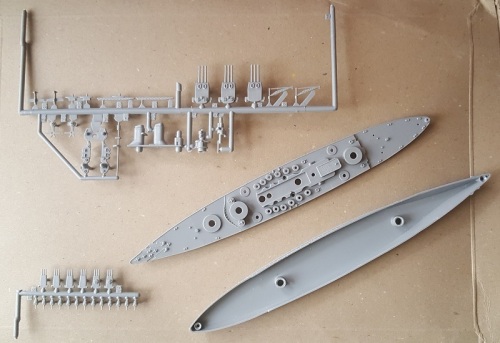
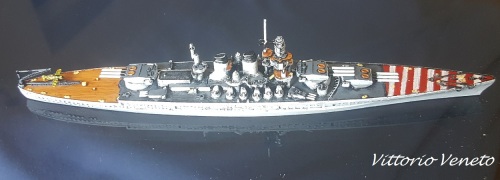
I put ‘Roma’ in brackets as that is the title now on the box of this re-issue of a Littorio class battleship. I shall need two of them and my first build will be Vittorio Veneto.
Anyway, full marks to this little kit. It was an easy and pleasing build …
I put some filler in the hull to give it a more robust feel …

Then pushed it all together in 20 minutes or so … Everything fitted easily enough, so I proceeded to glue it up. Modellers will be pleased that you get some spare pieces on the sprue.

This will allow a slightly different configuration for Littorio.
The only negative comment is that there are no lifeboats on deck … which looks a little odd. I will certainly go back and add a few spares.
Nevertheless, it paints up quite nicely. It is a much easier build than the equivalent Airfix models.

I like it. Excellent value and good looking. Plus … goes together well … Minus … no lifeboats or tenders. But recommended for your Regia Marina nonetheless.


**************************************************************************************
Peter Pig Russian Scouts (15mm metal)

So, this is the beginning of Martin’s revamp of the Russian WWII range. And boy has he been busy. The range is immense. My platoon is but a handful of the available packs.
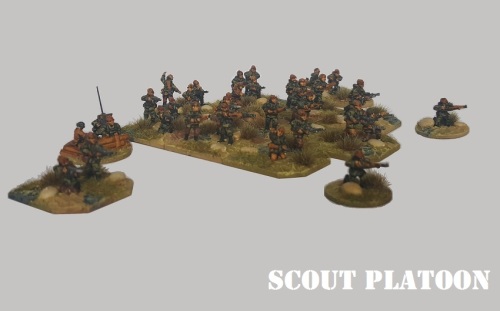
So … size and style: these are classic PP … heads are nicely sized and the figures are middle 15mm … compact and very well detailed in that unobtrusive Piggie way. Rifles are still deliberately chunky and robust.
There is a pack of female snipers which I have mixed into the platoon. Nicely proportioned.
All the figures have a two-piece coverall (I’d have prefered the iconic one-piece but … ) … light equipment and pilotka caps. The rifles are Moisin Nagants, the LMGs DPs and the SMGs PPShs …


OK I cheated a bit with the support weapons and cobbled them together from scrap … the command stand is from the new range though – as are some of the crew figures.
The platoon is really for PBI but I also did a radio stand to add in for NQM/Megablitz usage. The radio men are in the Scouts range, the telegraphist is from a super little WWI German set but looks just like the kit you see in pictures of later Red Army coms posts.

All these figures are great of course. I hope by the time I publish this there will be an iconic SVT-40 set (this is the standard squad weapon at the outset of the Great Patriotic War and very much under represented in wargame interpretations of the Red Army) ..
But so far so good.
Highly recommended – an expanding range so keep an eye out.
**************************************************************************************
Some Plastic Soldier Company SP guns (15mm plastics)

Thanks to Chris from NQM for some spare sprues … I got to make up some PSC vehicles.
Chris is a big fan – so take his word for it … he knows his stuff.
I’m not so enamoured and here’s why:
Yes, they are good, but they are fiddlier than I want from a 15mm wargame model – it is almost like back to the bad old Airfix days (remember the wheels on the Pz IV?) …

Really? This is somebody else’s hobby. I’m fine making and converting scale models but I suppose I am spoiled by nice simple chunky metal and resin/metal models and for wargaming I prefer the robust and weighty appeal of Peter Pig or Battlefront.
And so, yes, as an aside, I am sad that Flames of War are going over to plastic kits.
OK – the Stug … I already have some by Peter Pig and Zvezda, so let’s compare …
Sizewise, they virtually identical … the PP looks a bit longer by virtue of chunkier mudguards. It has cruder details than its plastic cousins.

The Zvezda model has crisper detailing and is much simpler to assemble. All the parts on the Zvezda model clicked together straight off the sprue … some parts on the PSC needed adjusting to fit and some broke. I prefer the Zvezda wheels, but the PSC tracks are better – however there is a price to pay: the PSC tracks are two-part and have to be glued around the wheel assemblies. It isn’t a perfect solution and all adds to why the PSC takes easily 4 times as long to make and involves more cursing.
 (The Zvezda model – foreground – looks chunky with a PP gun and crewman)
Now pundits often express a preference for PSC’s ‘hard’ plastic over e.g. Zvezda’s ‘soft’ … well there isn’t much in – indeed on simple hardness, the Zvezda plastic seems the harder (and certainlu isn’t the bendy polythene of older soft models) …

Both models have been packed inside with basing filler to give them weight. The flimsy MG on the PSC model has been replaced with a Battlefront spare.
The Marder …

… and very pretty I think it looks … hopefully readers will appreciate that when I bemoan fiddly detail it isn’t that I can’t do it – I just don’t want the designer to commit me to doing it above and beyond my calling. And the gun carriage did not fit the mount. That’s pretty fundamental to a model like this.

It took quite a long time to build. It has quite a few breakable bits sticking off so might not fare well if subject to tabletop wear and tear …
Verdict: terrific little models … you couldn’t fault them unless you didn’t like the whole kit building thing … they aren’t as chunky as traditional wargame models and I don’t think complex ones like the Marder will prove to be robust.
I prefer Zvezda on price, detail and ease of assembly … and on being to buy the quantity I like rather than big boxes.
But actually I kind of still prefer Peter Pig, Battlefront or Skytrex. So still not a resounding response from me, nice though they undoubtedly are.
 (PSC Marder III – foreground – and Battlefront Marder III Ausf H – background)
**************************************************************************************
Decals for 1:100 vehicles
 (Sgts Mess and I-94 decal sheets)
Strictly the Sgts Mess ones (produced by CitadelSix) are 20mm but I wanted some quite big ambulance crosses and saw them at a show.
Now I’ve not been much of a decal user but was taken with some pictures of German half tracks with number plates and so on so was tempted to have a go …
 (Open Blitz, now sporting a number plate in experiment no 1)
So … first impressions … I didn’t find the Sgts Mess ones very good – quite fragile, and the printing is not very sharp. The colour is not very deep. I will use them up (eventually) but my verdict was a thumbs down, I’m afraid.


I tried overpainting them to get a better colour but this isn’t a very attractive solution.
I was much happier with the I-94 sheets I got from Minibits … they are sharp and crisp and (so far) I haven’t had one break up. They did the number plates.
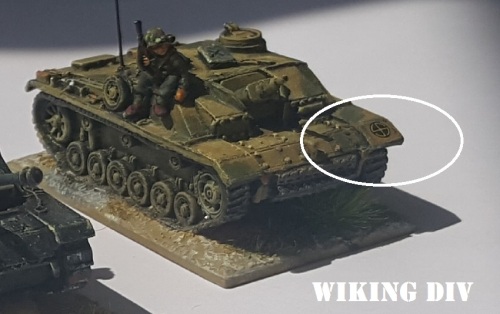
They do unit specific sheets which have badges and markings for well known formations, as well as generic balkan kruezen etc. I tried the Wiking Div ones ..
 (PSC Marder in Wiking livery)
Aren’t they great? The kill rings are quite tricky to do but the little badges are simple and neat. In fact I enjoyed using them. Full marks.
I will going through my collection badging up where appropriate (I have some Russian tac markings and a sheet of slogans, too, as well as the more predictable German stuff).
After some experiment, my method now looks like: gloss varnish where the decal is to be applied.; position and then dab dry … ; gloss varnish to set the decal in place, then spray dull as appropriate to get the right finish.
It sounds laborious, but do a batch of several and it is surprisingly quick – and I do like the results. So far, so good.
I can recommend I-94 decals.
*******************************************************************************************************************
Litko Flight Stands and Flak Markers …

I got a bit carried away at Derby and bought a few bunnles of plastic …

Some clear plastic rod sold for flight stands (not too expensive @ 50p per 6″ stick) and some excellent coolars at just £1 a pack … as I suspected, the collars will give me a suitable ‘foot’ on the sticks to enable them to base up successfully (or, so far, seem ‘so good’) … and …

… some slightly pricey acrylic flak markers (3 to a £10 packet) …
Now I quite like Litko’s acrylic explosions so I hope the flak markers (which click together OK) will serve me well to mark AA action …
But I do declare the flight stands a success … I am very pleased …
I have thus far used wooden dowel (actuall kebab skewer) but have found it a little too fragile – then again, bespoke flight stands seem expensive and a bit, well … synthetic …
So my trial was to click a collar over the stand …

Superglue this to a coin (which worked) then … experimenting with what worked as I was going … glueing the whole assembly to a MDF base …

… again, so far so good … so I bedded the the coin base in with filler and painted it black. I added a balsa wedge to create somewhere to caption the flight for games …. (going for a bit of a ‘plotter table’ look in the end) …

… all black at the bottom … I think they look good. I decided I would very the height of the stand by mission choice (so, e.g. as with the Storch, the full 6″ for spotters … ) meaning a lot of the NQM usage (ground attack) would be on half length posts, so further improving the economy.
I think this is going to turn out very well.
 (‘work in progress’ VVS ground attack units)
Graham thought the flak markers might look better with some cotton wool wisps blowing off them …

Not quite there yet … but something to experiment with ..
Over all, full marks to Litko for the flight stands and especially the super useful collars … I can now base up my planes tidily for the tabletop …
*******************************************************************************************************************
Small scale decals from Minibits …

I’m not a big fan of decals but these water slides are inexpensive and much easier to use than e.g. the ones that come in the Zvezda or Airfix kits and they come in tiny sizes that solve the real problems of marking on small scale models ..
I got mine from Minibits: here and they cost (at the time of writing) £2.50 for 2 sheets. I got a 1:100/1:144 and a 1:285/1:600 pack. The smaller size has just under 100 markings per sheet (so you can figure out they are just a few pennies each) …

The swastikas on Prinz Eugen and Bismarck are from the larger set and the crosses on Eugen’s spotter are from the smaller one …
 (Zvezda JU52)
The crosses here are from the supplied set, the swastika from the larger size set from Minibits. Zvezda, of course, do not supply swastikas, so there is a problem modellers may or may not choose to address.

Here, some small markings are used on a 2mm Irregular bomber …
I am entirely satisfied both with the utility and price of these … they are durable and easy to use. I am no expert with decals and usually end up in a mess so they must be pretty good.
Recommended – I can see myself using a lot of these …
*******************************************************************************************************************
 Skytrex Sdkfz-7 shootout …
I had waited 7 weeks (to no avail) for Battlefront to deliver a resin Sdkfz-7 when I finally gave up and bought one from Skytrex.
It cost slightly less, is all-metal construction … and arrived within 3 days (allowing my long delayed project to be completed) ..
So … how do they shape up? I looked at the Skytrex model alongside one from Forged in Battle from my collection and a Battlefront example loaned for the pictures by NQM Chris …
 (Skytrex – left … Forged in Battle – right … and Battlefront – foreground)
At this stage it is worth stating what Chris pointed out to me … that, despite what it says on the pack, the Battlefront model is not a Sdkfz-7 but the slightly shorter and less powerful ‘6’ .. look in particular at the much less generous opening for the driver access (and tighter spacing between front wheels and the tracks): these are not mistakes – these are correct features of a different tractor.
So perhaps I’m lucky to have missed out on the BF/Flames of War model.
Battlefront offer either a resin (twin pack) or expensive* resin/metal model (both of which seem permanently out of stock**), Forged in Battle an all resin model (as part of a big 88 battery set), while the metal Sytrex model is available singly or in a gun pack.
The model is in 5 parts – hull including wheels, a track component for each side, a choice of either roof-up or roof-down parts, and a windscreen. There is also a driver.
 (the Skytrex model comes with a choice of roof-up or roof-down)
The Skytrex and FiB are pretty much the same size … Similar in length, the Skytrex model is about 1/2mm wider and perhaps a fraction of a mm lower in height …
The detail is very good and includes e.g. the bench seat backs – the wheels seem particularly crisp compared with the equivalent resin models. The parts are a very good fit and the simplicity of the model means it goes together in next to no time.

I filled both tractors with Peter Pig Hanomag crews and the Skytrex model painted up well following my usual Vallejo acrylic over Humbrol enamel process …

I think the pictures speak for themselves … This is an excellent model and ticks all the boxes. The price is right and the service is first class. If you want a single vehicle it is the only real option.

 (Skytrex 15mm Sdkfz-7)
*£8.00 at the time of writing compared with e.g. £6.50 for the Skytrex equivalent …
**not listed as such on the website but I have had 3 failed orders over 2 years so apparent stock on the website does not mean available to UK customers.
*******************************************************************************************************************

3 New Zvezda releases … Eastern Front Scouts and Bombers …
Long awaited (by me, at least) and much delayed, we have recently had the JU88 (1:200) , PO2 and HS 126 (both 1:144).
At 1:144 the HS 126 looks a big unit and at 1:200 the JU88s seem on the small side. But I checked the stats and they seem correct (the 126, with a wingspan of 14.5M and standing nearly 4M high is quite a lot of plane) …
That said, these are the right scales for me (I work with 6 and 10mm terrain and 15mm figures … overhead, close support like fighter bombers and dive bombers look best at 1:144, more distant strikers are better at 1:200 as they are further away)
The 1:200 bombers clip together nicely and quickly, the 1:144 planes are more of a modelling challenge with fiddly struts and pegs that don’t quick click … (not quite like the BA 6 armoured car but that kind of thing)
JU88

Universal light/(some say medium) bomber. No parts that I found fiddly … there is an aerial on top of the cockpit which comes as part of the soft clear plastic part (and was mangled on both the models I made up) – so not 10 out of 10 but no real criticism of this sleek machine of which German forces need plenty. Suitable for all periods.

So this is a really useful wargame model. Has under wing bomb racks and 4 separate bombs (which is a useful way for the model to be presented) …

PO2

Polikarpov‘s U2 or PO2 was basically the Soviet Union’s flying jeep. Cheap, durable and made by the tens of thousands, it fulfilled every sort of role from recce and medevac, to postal service, taxi and light bomber – the infamous Nachthexen flew these.

It’s a nice model in relatively hard plastic, but I must say that I could have done with an extra set of fingers to get all those pegging points to clip in when fitting the top wing.
The model does not come with any crew, so I added a metal Peter Pig 1:144 flyer (as shown in the picture).

As usual with Zvezda Art of Tactic, these go together in around 20 minutes or so (removing the components from their sprues is the most time consuming phase, really), and there is no limit to how many of these the Red Army could usefully deploy.

HS 126b
 (Zvezda’s HS 126 reconnaissance plane)
Scouting for the Germans in the Early War years was the rugged Henschel HS 126 … this is probably the the most model-like of the kits … It makes into a splendid little bird, but I found it difficult to get exactly right and I’m rather pleased I don’t need lots of them.

 (Zvezda’s 1:144 German HS 126 Scout Plane)
To give an idea of size, here is one on the ground with some 15mm vehicles …

As usual, all models are unwashed, assembled with Superglue, primed with Humbrol enamel then finished with the usual acrylics, enamels and varnishes.
The decals on the models are the Zvezda ones although I do still find them a bit fragile and annoying. The JU88 ones seem quite big for the size of the model.
Really useful additions to the Zvezda inventory … hope the SB2 Soviet bomber follows soon …
All the models came by mail order from Models2U and were delivered within an impressive 3 working days of my order.

*******************************************************************************************************************

QRF’s Mercedes Benz LR4500(GSV13)
I needed something to tow that 15 cm sFH piece and Battlefront’s Sdkfz 7 seems perpetually out of stock. The big Mercedes Maultier truck from QRF is another heavy workhorse that moved field artillery and 88s.
At the time of reviewing it costs £6.00 and is very big … a little stretched, even, for 1/100. It comes as a 7 part kit and is not without its faults …

First, as you can see from the parts picture the front wheels that came in my pack are in fact a front wheel and a rear wheel (the latter being the deeply inset outer of a twin wheel) … not a major problem for me as I have a pack of the plastic model set of which they appear to be copies (so have just swapped the rear for a matching front).
But this is quite a problem otherwise, so I will checking with QRF to see if it can be fixed.
There is no axle or stubs for fixing the wheels to the body … and likewise, there are no mounting points for the tracks – so things are just glued on without lugs or really much of a contact area.
As is common on much of the QRF range, there is just one track component of which you get 2 copies – it’s almost a clever idea, but I have never found they work quite well enough (neither side of the track is really optimised to fix to the hull, and the hulls have no detail raised to mate with them)
I had to cut an axle to be able to attach the wheels at all (they sort of glue up on the underside of the mudguards but on my casting, this was not really moulded cleanly enough to take a metal-to-metal join)

Unbased, this is not a very strong method of assembly. The nice model pictured actually fell apart before basing. Instead of repairing it loose, I glued the wheels and tracks down to the base in the right place, then dropped the chassis in on top.
 (QRF Merc towing the BF 150 … with some Piggie Hanomag crew in the back)

Here it is alongside a Forged in Battle Sdkfz 7, the orthodox tow for the 150. A good match. All the figures are Peter Pig.
 (as you can seem it is indeed a big truck … here towing an 88 – a pak 43)
Overall, because of the unhelpful assembly, it is hard to recommend this model other than for variety.
*******************************************************************************************************************
Finnish Sissi Troops (Winter) (FSO115)

Battlefront/Flames of War recently added some notionally Finnish ski soldiers to their listings … very welcome. There are very few figures available for the big chunk of the war on the Eastern Front that was fought in snow conditions. Peter Pig do a single (3 variant) pack (of Germans) and Khurasan do a small (notionally Sci-Fi) range of soldiers (and a few civilians) in parkas.
So this 5 figures pack adds a lot of variety to an area with few choices.
 (full contents of the pack)
So what do you get? Well the first point to make is you don’t get what the online shop shows on its picture … it shows 4 skiing figures on a standard base … you get 3 skiing figures, 2 shooting and no base … You get 2 pairs of separate ski poles (I assume to go with the shooting figures) and 2 spare pairs of skis (not sure why but they will be very useful)
I was relieved that they were all metal, not plastic or plastic/metal hybrids.
The figures are average height for 15mm and quite nicely proportioned … quite long legged, with bigger weapons and smaller heads than Peter Pig does these days … less chunky than Khurasan’s men in parkas. But perfectly compatible.
 (if this lot all stood in the same posture they would all be about the same height)
They are in snow coveralls with very little equipment showing, so will do for Germans and Russians as well as Finns. They wear ushankas and have either a bolt action rifle or a PPSh – again, pretty universal albeit in reality probably Soviet. Give or take the WWII era weapons, you could probably use these for more recent periods as well.
I’m not completely convinced by the decision to make these as ankle plug-ins to the separate ‘ski’n’boots’ base. But only time will tell (it looks like it would make a weak point out of a weak point but I will be generous with the varnish).
If you don’t like paying more than 40p for a 15mm figure, I should warn you that they come in at £2.75 for 5 (Peter Pig skiers are £2.90 for 6 …) and by the time BF added £1.75 postage the cost was £4.50 … so 90p/figure! Seems like, however you play it, skiing is an expensive hobby.
I don’t mind that for a sprinkling of variety but I suspect few players will want dozens of them.

As I hope is evident, they paint up nicely and look fine mixed in with a mainly Peter Pig unit. These were prepared with my usual acrylic over Humbrol black enamel base and benefited from a quick selective brush over with Ronseal …
The basing is clear acrylic (more forgiving of table surface types than landscaped white) with GW snow flock and the odd rock and tuft.
Conclusion
I think these figures are excellent and add a lot of variety. I much prefer the slimmer, smaller figure style of recent Battlefront releases … and unlike the old semi-fantasy munchkin figures, I am happy to use these straight from the packet.
Recommended.
 (L-R Piggie with swapped head, 3 BFs as supplied, Khurasan with swapped and finally another straight BF – inset, BF’s slightly misleading 4 figure photo)

********************************************************************************************************************MININATUR Plane-tree foliage (933-24 S)

From the tuft people, I bought this to try out as a potentially authentic looking ‘shrubbery’ type vehicle camo. It is like a webby mesh with leaves embedded in it and looks very realistic to me …
You need to snip chunks out – I guess whatever suits the task in hand or looks right. Here’s a close up …

The photo is less sharp than I would like but the leaves are less than 2mms across so I’m not really optimised for it.
Then you PVA it onto the vehicle. With no experience of the product, I decided to dress up mt trust Tiger tank before embarking on a full box of kit. Actually I’m quite pleased.
 (Battlefront Tiger camo’d with a mix of MiniNatur Plane-tree foliage and Javis clump foliage)
It seems to have taken well with the PVA, and looks nice mixed with a few lumps of the hedge-type clump material I already have plenty of (and which is less expensive so makes good ‘padding’) …
Full marks to this product – I think it looks almost ‘real’. I paid £4.25 for that strip and I reckon that the amount I snipped off for the Tiger would allow you to do 30 or so vehicles … so 15p – maybe 20? – per vehicle. Well I think that’s good value even if the pack price is more than I usually pay for scenic stuff.
*********************************************************************************************************************************
Forged in Battle’s StuG Battery support vehicles.
3 models for £15 cast in cream coloured resin with integral bases.

2 Sdkfz 252 munitions carriers and an Sdkfz 253 armoured observation vehicle – both vehicles, of course, based on the common Demag light half track chassis.
There are 3 cast metal components: a waist up observer to fit in the top of the 253, and the towing arm of each trailer to glue in between it and the 252.
As usual with resin, the come with bases cast on, like it or lump it. Obviously I base all vehicles and figures, but don’t much like having it done for me (thickness, size, shape etc. are now harder for me to control and I can’t see under the vehicle).

(the completed set, rebased and with a floor brush aerial fitted on the 253)
To rebase successfully, I break away as much of the resin base as possible, sand it down, then cut out a recess in the MDF base I want to use (and drop the model into the void): after texturing in the result can barely be distinguished from properly based regular vehicles.
As for seeing underneath … well, half track and tanks aren’t so bad in this respect.
Quality and price are OK … the detail is crisp and accurate – but sometimes it does break off … look at the track on the right closely and you can see a gap …

Although this does not notice until pointed out, it is nevertheless the price of resin, and is why resin vehicles should be cheaper. At £5 (but you can’t just have one) they are not that cheap (more expensive than Zvezda plastic/cheaper than metal and metal/resin hybrids).
Nevertheless, I do like them and they will they will fit in very nicely with the big vision game’s need for self propelled LOG.
*********************************************************************************************************************************
QRF’s German Field Kitchen  I spotted this the other day on QRF’s ‘German Softskins’ listing, and with no picture, I trusted their advice that it was a good modern QRF piece and ordered some. I am glad I did.
First off, full marks for service … the goods arrived within a week, the order was correct and all the packs were complete. For £5 you get a Field Kitchen plus ‘limber’, 4 horses to pull it, and a couple of chefs to do the cooking.
There was no driver for the rig – which I have to assume is correct – so I added a spare Battlefront figure (so do note that when you look at the pictures of the completed model) …

The model comes as 14 pieces … the two bodies, 4 horses and 4 wheels, a separate lid for the big pot, a separate stove pipe, plus the figures. The stove pipes were taken down and laid flat for transit, so you have options to model either on the move, or with the stove pipe up, and the lid up to stir or serve the gulasch.
That’s not too much assembly, but enough to allow some scope. Again good. The figures are pretty good – better than the QRF average – although the one with the loaf of bread does remind me of Postman Pat.
There was a little bit of casting fade in the corners of the limber … but as I intended to trim the back a bit, nothing I couldn’t cope with. The limber is the only bit I would query as most pictures and reconstructions seem to show a shelf for milk churns and the like (which would have been nice) … but that’s a pretty minor quibble. The equipment is pretty authentic as far as I can see, and I think most people will be delighted with it just as comes out of the pack.
 (reenactor’s Gulaschkanone I snapped at History Live! earlier in the year)
I took quite a few pictures at Kelmarsh this year as I thought I was going to have to scratchbuild one of these.
Four horses is really more than I need, and otherwise, as above, I have reprofiled the back of the limber and added adriver … that is really all the fiddling I thought was necessary – and I think the results look great. I like this model …
 (QRF’s 15mm German Field Kitchen)
A great objective marker for low level games like PBI perhaps, and I will be using several as log/admin in Operational Games.
*********************************************************************************************************************************
New Supplies
I just got some bits in from MJFigures and Khurasan – very efficient service from both (Khurasan are from the US, so took a week longer but I expected that) … I have given the Khurasan link direct to their Planet 15 Sci-Fi list as that is where the men in Parkas are.
 (man in parka test paint … I am very pleased)
Although hidden away on a page I wouldn’t normally browse (but did thanks to a TMP news post), these are basically just men in Parkas with guns (neither really military or civilian, and not specifically Sci-Fi either). They are a great addition to a very limited choice of troops suitable for arctic/winter battles and engagements.
I bought one each of the packs (excluding monsters) … which gives 12 different figures, a dog, and an oddity figure with sombrero and flamethrower (or maybe insecticide spraying gear …): well after a few cuts I may be able to use him but I guess he is the one ‘unmilitary‘ figure (he is a civilian anyway, albeit odd) …

They have their characteristic big jackets with fur lined hoods, the lower face masked, and goggles. I haven’t decided the best way to paint that goggled face yet (really, you shouldn’t see much ‘face’ at all, but the test paint looks a bit ‘muppet minstrel’ to me, so experiments will continue).
The weapons are generic, so I thought this would be a good time to indulge a pack of spare weapons from MJ … I was surprised at how good they are … the FN/SLR and M16s are brilliant – it almost seems a shame to use them … they are £2/pack so to make the occasional conversion are pretty good value I think.
 (MJ Figures ‘accessories’ mixed weapons)
How big are they? What will they suit? I quickly glued a couple of weapons on as a test …
 (left: a BF figure with FN, right a PP figure with M16 … spot on, I reckon)
I think they will do nicely. A couple of comparison shots of the Khurasan guys …
 (some of the parka figures with that BF/MJ test and with a couple of PP ski troops)
Again, I think this is fine: the men in parkas look a bit chunkier … but so they should, that’s the parka! Although I have the spare weapons, the ones on the figures are quite good despite my worries – in this scale they may be ‘good enough’ for a whole range of period for many enthusiasts …
 (same test figure pictured with a painted Skytrex and Peter Pig)
So, all in all, I can recommend these as a way to expand the limited options for wargaming the frozen wastes … great figures, nicely compatible and reliable service.
If you want to tune them to the, ahem, Cold War period, then MJF would be a good source of very accurately made replacement weapons.
*********************************************************************************************************************************
Red Army Quad Maxim anti-aircraft guns from Peter Pig

After a long gap, Peter Pig have added Katyusha crews and Quad maxim guns to the PBI WWII Russian range.
These are clearly intended to give you some nice ways to use the recent cheap plastic Zvezda trucks (Katyusha and Zis 5) – though you could also use metal trucks from PP and others, of course.
Now, Battlefront have offered these in the past – they were part of the very good selection of early equipment for the Eastern Front which they withdrew as it no longer suited BF to let you buy the models you want rather than the ones they want you to buy (which will then channel you into the Flames of War hobby in the phase they are currently developing for you).

I have some of the originals, so we can line them up ans compare … Nearest is a BF original Quad maxim in a BF truck. Good, isn’t it? In the middle is one of the new PP weapons in a Zvezda Zis-5 (probably what most wargamers will use, given the price of Battlefront or metal trucks) … and at the back, one of my BF trucks with the PP weapons and crew.

For fairness, I remounted the old BF gun in a new truck, and the PP in the old one … by old, I’m referring to cream resin, and with the obvious inaccuracy that purists will immediately notice. Looking at the old and new/BF and PP side-by-side …

… they are very similar … the PP weapon being a little bigger and more finely (and more accurately) modelled. The BF one I have shown with a new series and an old series crew figure. The ‘new series’ has a big head, of course. Otherwise all the figures are nice models and are all the same size.

Hopefully that’s clear … there is no size difference between current PP and BF figures – just current BF figures usually have huge heads (PP, frankly, have big heads .. BF, especially their Russians, are even bigger)* In the packs you get 2 complete (3-piece) weapons each with 2 crew figures.
I think that’s good value as they are quite nicely detailed and, as above, big, weapons. Here’s one loose mounted in the Zvezda truck (glued to its own base, you could use this technique if you wanted more flexibility ..

… and it gives us a chance to have look at the weapon itself… 
Quite detailed, fits together well and matches very neatly to surviving examples …

Other than Martin’s model doesn’t have the characteristic shoulder rests. Before I assembled the models, I had imagines that I would trim the base down so it would sit deeper in the back of the truck (as modelling thicknesses always mean the backs are pretty shallow.
In fact, I think the look is quite good … it is a big clumsy weapons system which sits very exposed in the back of a truck and the PP model seems to capture that rather well …

Uses: in addition to truck and half-track truck mounts, the Quad Maxim system was used on armoured trains and ships … They were used by Finns and even saw service in the Spanish Civil War …

So a really useful addition to the PP range with a surprising number of uses. A well-crafted and good value product. *PP do separate heads, of course, so, happily, BF figures can be corrected by a quick head swap.
KATYUSHA Rocket Launcher crews
The other pack is a set of crew figures for the iconic Katyusha …

The old Battlefront model used to come with a full crew of loaders and spare rockets, and Peter Pig have now made these as options to enhance your Flames of War batteries or to crew out Zvezda plastic models (which, as usual, come with out any figures).
The figures are excellent, full modern 15mm in size, but without massive heads. There is a good mix in the pack … you get 2 groups, each of an Officer, a man with an upright rocket and a pair loading one up at shoulder height. Here, I have made a couple of ‘deployed’ bases (used to indicate that the weapons are available to fire rather than ‘in transit’) mixing some of the new Piggies with some old Battlefront.
All figures are, as usual, the same size, and, being older figures, the BF loaders have sensibly sized heads which don’t need replacing. There are some swaps within the groups, but just for variety.

Piggies nearest the camera (the standing rocket is from the old Battlefront set).

… and loading up …
 (the Zis-based Katyusha in the pictures is a BF/Zvezda hybrid)
These new figures are great … I’d add a pack per two weapons if I were adding rocket artillery (and I’d recommend the Zvezda model for the vehicles themselves) …
Excellent. **********************************************************************************************************************************  Shell Holes …
I got a pack of these from Early War Miniatures and have had a go at painting them up. I recognised that my 20th cent. tables have been short of shell damage, and this pack of 30 holes for £6.50 looked easier than making them by hand. They are of pressed plastic sheet, a bit like the old Bellona stuff from yesteryear.
Most of my old Bellona bits are a tad fragile, but still have survived, so the material is probably OK and I have painted it in the usual ways … (enamel primer/undercoat, acrylics etc. on top). I went for a mix of cut out holes, rubbly holes and muddy holes, and for a mix of summer and winter holes. Winter holes are problematic: fresh ones would be dirt, the same as at any time of year … then they might soon fill up with snow. I’ve gone for something in between.
I will report back.

Here some are with some 15mm tanks and soldiers for scale. Made for 28s, they look about right with these chaps. I think they will be a good way of creating ‘partial’ squares in PBI, and go well with smashed buildings. So far, so good.
**********************************************************************************************************************************

Warbases Stalingrad buildings before and after painting
STALINGRAD MDF buildings from Warbases … I’m happy enough scratchbuilding houses and sheds for wargames … I started all this in the late 60s, so to me it almost seems like you ought to do scenic stuff yourself! However tenements and factories with all those windows have always seemed a step too far (I get bored cutting out windows after the first two or three … and then the accuracy goes awry) So I was rather taken with the Warbases flatpack Stalingrad buildings: basically (1 large, 1 smaller) they are just 4 walls and a floor with all the windows cut out of the front and back walls.

Warbases Stalingrad A
I painted them smokey and distressed concrete grey as I had it in mind that it would be good if they looked OK both in normal conditions and covered in snow*. I really liked the result. I had originally chosen not to bother with the floor … but finding I don’t like inserting soldiers right down into a box, I experimented with putting the floor in, and higher up. To gauge the look, I popped in some AK47 figures and really liked the way it seemed to transform them into desolate Post Modern ruins …

Warbases Stalingrad B
So on the B model, I blew a hole in the floor, inserted it on level 1, and added a bit more terrain weathering … to give a bit more compatibility with my AK gear. I think it works, and I’d recommend these basic components as good for all kinds of terrain building from early 20th Century and WWII (including the suggested Stalingrad) to desolate urban Sci-Fi (if that’s what floats your boat) The price (Spring 2013) id £4 for the bigger one, £3 for the smaller. I think those are good prices. I also tried my hand at chopping them around a bit for variety, and found this easy and rewarding (it is as hard or easy as sawing MDF – according to your skills) …  (this is 3-wide variant of the A building) I did the cuts reasonably carefully so was able to get an extra building out of the scrap. So I’m very pleased. Here are a couple of (15mm) mock ups so you can get an idea of the size …
  (WWII environment … maybe Stalingrad … Peter Pig StuG, Skytrex RSO and Pak 38)
  (AK 47/Post War environment … Peter Pig figures, Skytrex T55s, Timecast wreck and toy bus to Brixworth) I will be buying some more – these are good products at the right price. *the very enthusiastic might like to know that they are Panzer Grey (well I thought it would do) dry brushed with grey and cheap craft shop fawn, smoked over the windows, then a lighter dry brush in cream … after which I added the white dribble effects as a finishing touch! **********************************************************************************************************************************

Zvezda’s 1/100 BA-10
I’m almost tempted to give this model a good review: I do like the tanks in this range, and the finished model looks good enough to do the job. I can’t say I enjoyed building it, however, and it wasn’t quick. As you can see from the sprue, there are quite a few components, and it uses a slightly quirky ‘over and under’ configuration for snapping the hull together (I think that’s what leads to the big gaps in the clipped-together photo) …

Zvezda’s BA-10 clipped together
OK – normally we’d glue these kits anyway … which I did – and with superglue and clamping, the gaps closed up. But it’s a pain, and wastes time. However, it is the small suspension components that annoyed me – to thin in 1/100 to be durable (easy to break just in cutting them free of the sprue) and I really doubt you can see them in the finished model – so a lot of fiddle for not much gain, I think (and to me, that adds up to bad design) …

Zvezda’s BA-10 finished and painted
Comparisons Here it is alongside a Battlefront/Flames of War model: the comparison is fair enough as only the turrets really differ (the BA-6 is actually a BA-10 I ‘retro-built’ into a BA-6 by swapping the conical turret for the ubiquitous late 30s universal turret) …  As you can see, they are virtually the same other than the turrets and the slightly more authentic styles wheels on the Zvezda model. Well that and the price (you can get 3 Zvezdas for one BF if you shop around) …

Flames of war or Zvezda?
The BF/FoW does feel chunkier – but not by much … the last tweak I made before glueing the main components was to fill the Zvezda model up with plasticine. A cheap, easy and highly recommended dodge with these lightweight vehicles. Conclusion: Not as much to my taste as Zvezda’s tanks and planes – but you might like the price compared to resin or metal. 6 out of 10 maybe? ********************************************************************************************************************************** Well … just looking at more of the Red Army tank options in general … Once upon a time, in 15mm, there was Peter Pig, Skytrex (CD), the hard to get (if in the UK) and poorly supported* Quality Castings, and the newcomer Battlefront/Flames of War. Then along came PSC with hard plastic kits and figures … and most recently Zvezda, and the 1/100 offerings in the multi-scale Art of Tactic game/range. Of course, nothing beats the heft of metal tanks, and the durability of metal trucks … but from the ‘half-way-house’ of Battlefront (resin tubs with metal tracks and components) we are now in the age of plastic. Generally, I dislike hard plastic … especially in 15mm, where it is too easily broken. So an opening comment: Battlefront’s resin vehicles with hard plastic weapons (say, the half-tracks), seem the worst solution of all (wrong material for each components) – and another: although my example looks good enough, the gluing hard tracks around wheel assemblies design used by PSC is awful (and gets a big thumbs down). Anyway, what do they look like? T-34
 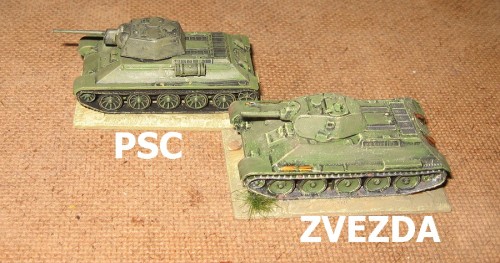 (here’s a couple of popular plastic T-34s) The PSCs are around £3 each if you buy 5 at a time (or singly for £4.99), the Zvezdas are sold singly for £2.50 each (£2.75 if you don’t shop around). The PSC is ‘hard’ plastic, the Zvezda a very hard ‘soft’ plastic. The PSC is a pain to build, but comes with an 85mm turret option (like the old Airfix model) – the Zvezda is beautifully build, so snaps together in a couple of minutes …
  I prefer the Zvezda model: the pricing is better (PSC are only good value if you want lots), and I prefer the less brittle plastic. The spare turret and the lovely road wheels are a big plus for the PSC – the again, that early model turret on the Zvezda is splendid (and just right for 1941). As a compromise, you might like the early turret on the PSC chassis (you would need to alter the driver’s hatch and one or two other details (but it would give you the best of all models!)
 NB: Despite my enthusiasm for Zvezda’s tanks, I’m less impressed with the fiddly detail they put on their trucks which makes them much more time-consuming to put together (at 1/100, the components really are just too thin and bendy) … If it matters to you, the Zvezda is the slightly larger of the two, and is an exact match for the Battlefront/FOW T-34. BT series Adding to what I have already examined, for completeness, I recently got a Finnish BT-42 (a BT7 with a silly ‘pillbox’ turret), which I mated with a QRF turret (recreating the Russian BT models which BF have deleted because for some reason they don’t suit its manipulation of the market at the moment …)..
  I have to say that it is actually a lovely model, with well detailed wheels correctly spaced (unlike QRF). In truth, one of the rear mudguards is broken (the common downside with resin models) … Ah well … It mixes well with Zvezda and QRF composites.

QRF, Zvezda and BF hulls side-by-side
(all have QRF turrets) The only real size difference is that the BF model is around a mm wider.
measurements
(viewed from on top, you really can see the chunk of resin missing at the rear of the Battlefront model – I will have to go back and fix it. ****!) Nice to have the BF chassis in the mix, but for me, the Zvezda gets the top mark. Fun BT series special This is one of several experimental rocket artillery tanks devised in the 1930s. A proper composite, it has a Zvezda hull, QRF tracks (chopped up and repositioned to get the wheel spacing right) and an old BF T-26 turret from the junk box (note the cream resin!).

adjusting up the tracks

 (intended for operational games, this model will stand in for a Katyusha battery) T-26 After all those BTs, here’s a quick look at the Zvezda T-26 to wrap up this lengthy overview …
Zvezda T-26 unpainted

Zvezda T-26 painted
As you can see, the Zvezda model gets the running gear right (unlike QRF’s models) – so gets good marks from me

QRF (metal) and Zvezda (plastic) track components
With the assistance of a knife (to free up the sprockets) you can bend the QRF tracks into the right shape (as the photo shows). Of course, the Zvezda component still looks better – and actually fits properly (which is more than can be sad for the QRF tracks). At one stage, of course, QRF’s problematic models were one of the few options – now I think they have been superseded by the cheaper Zvezda alternative (unless you feel unable to do your own conversions – so would buy QRF for the variety of configurations) ..

QRF T-26 artillery tractor in towing mode
(as you can see, the flat QRF tracks can be persuaded into something like the characteristic T-26 shape) As for the Zvezda model itself, although it looks a bit bland, it merges into Red Army mechanised formations quite well, and is a good buy, I think …  *What? Half the items on your website without pictures? Whatever next! **********************************************************************************************************************************Revell’s 1:144 Micro Wings Focke Wulf 190
  I hadn’t intended another review yet (nor another airplane model) but I stumbled upon this (re-issue) range at my local model shop and had to try it out. The price was £1.99 which comes in even more economical than Zvezda. OK … it is a hard plastic kit of 12 parts excluding the stand. Putting it together was very reminiscent of the bad old days of assembling Airfix 1:72 models: some parts are fragile and hard to get off the sprue. The components don’t really fit together well (well not as the way that soft plastic Zvezda JU52 fitted together) and things like the undercarriage are a sloppy fit (so you have to prop them into position to get them to set at the right angle) …. The canopy is pukka clear plastic but no pilot is provided in the plane. I therefore provided one myself (a Peter Pig WWI flyer from range 6) … I therefore had to prepaint the interior of the cockpit before completing the assembly.

I added a PP pilot and prepainted the cockpit
It looks good enough, but I can see why some wargamers just paint out the windows. Making the pilot fit then painting the interior just added to the faffing about. The propellers on this plane seem more durable than the Zvezda equivalents and come (again like on old Airfix kit) with a spindle and lock arrangement so the propeller will spin. Even as I followed this procedure I wondered why I was bothering. Still … I made it properly (I think there’s a pun in there …)… and it does spin around freely – which is already a bit annoying.  For some reason I didn’t really enjoy painting this one, but documented the stages just in case anyone asked.
  The stand is certainly much more durable than the Zvezda equivalent … and with a bit of weight added, might be good enough for wargaming (fill it underneath and glue it to a 2p piece, I suspect). Like all the kit’s components, the fit was a problem – in this case it was too tight (yes, better than too loose, but it would have been nice if something had fitted without a fight of some sort …). So a nice enough little plane for a very small price. For me, however, another case where I clearly prefer ‘soft’ plastic to the more fashionable ‘hard’ plastic. In particular I think I much prefer soft plastic’s solid fuselages and (consequent) chunkier feel.

Revell’s 1:144 Focke Wulfe 190-A8 finished and painted
Pros: cost; stronger propeller gear c/w soft plastic; reasonably rugged stand … Cons: it is annoying to put together; fragile fiddly undercarriage*; just seems a bit flimsy. I really like the look of these inexpensive Revell 1:144 models and really wanted to like the Fw and wanted to enjoy making and painting it. For some reason I didn’t take to it and found it all a bit fiddly and annoying – too much like aero-modelling for my liking, I guess. I’ll keep an eye on the range – if only for variety.  (ready for action – but likely a lone predator) *I will almost certainly return to the model and close the undercarriage (to avoid damage) but suffice to say, when making the kit, I found the wheel bays not deep enough to close them flat (hence going with the instructions and modelling the wheels down) … ********************************************************************************************************************************** T60 Light Tank … Flames of War vs Skytrex …
  I have to admit this is a slightly unfair T-60 comparison/review. I was disatisfied with the Battlefront/Flames of War model I bought, so got the Skytrex one to see if it was any better – I confess up front, therefore, I am not coming at the models from a strictly neutral position. I bought from FoW because I like the way their vehicles come complete with some crew figures (and often some weapons or equipment options). I must say, however, I was surprised that what is quite a small vehicle commanded the ‘full’ tank price (currently £7.50!): it doesn’t have any options, but does have the ‘waist up’ crew figure … not a lot though. That is a significant 25% more than you pay for the same vehicle from Skytrex/Command Decision. Skytrex give you two models to choose between – the early model with spoked wheels or the later one which matches the FoW (model 1942). The Skytrex model is, of course, all metal. Both come as 6 part kits that take a bit of fiddling with to glue together nicely (not as accurately locking together, say, as a Zvezda plastic Art of Tactic model …) …

Skytrex (left) and Flames of War (with some real examples)
The two things I immediately noticed with the Battlefront model was that it had no exhaust (I actually rummaged in the packet for one because it just looked ‘missing’) and has no co-axial machinegun. There are some blueprints ommitting the exhaust and although photos show it, I’ll allow I can only say I think it is an ommission*. Re the guns, however, I think it is pretty clear (and standard) that the T60 turret had a 20mm canon offset on the RHS of the turret with a co-axial DT (see the line drawing after Zaloga)  (I’m slightly annoyed that I failed to spot the ‘wonky’ gun on the FoW model when I set this shot up: however, it will be obvious from the drawings that it shouldn’t overhang the front of the tank – so it’s really their fault not mine!) Although it is too long, I think the comparisions probably do show that the BF/FoW gun is more authentically slender, and they may just have the better interpretation of the octagonal turret.
  On the negative is the much higher price, the poorly cast mudguards, wrong gun layout and lack of an exhaust. You will have to add a crew member (mine is a chopped in half PPiggie) but I think this is a clear win for the Skytrex model. A purist might also lop off that chunky gun and replace it with a length of .8mm brass rod. An unfair comparison, then … the more expensive Battlefront/FoW T-60 has a cheaper resin hull, the parts were less crisply cast and the model does not seem as accurate as the better crafted Skytrex model. It does have a crew figure, but I can’t see anything in comparing the models to justify the former’s much higher price. I wish I had known that before I put my hand in my pocket.
  * it is very obviously not there on the pictures in the online store – so in this case ‘sans exhaust’ is how Battlefront think it should look. **NB, by the way, that in the original pack I bought there was no turret hatch – this was just a packing fault. It took a devil of a long time to get any customer service to replace it! I have not had this problem with other manufacturers … *** Assembly and painting notes: both models were assembled, after some filing of parts, with superglue. There was no need of filler. Both were painted with Valejo acrylic (Russian Uniform) Green over a Humbrol black undercoat, blushed with Humbrol green and dry-brushed with linen.
EDIT: since this review was published Zvezda have added 1:100 T60 to their Art of War simple clip together range. Medium hard plastic, it has the low relief detail typical of the range and is pretty simple … that makes it quick and easy to assemble and half the price of the competition. It is pretty much the same size as the others and has a nicely modelled gun and turret. Here are some comparisons …


 (15mm T60 comparison – FoW, Zvezda and Skytrex)
There is more on the Zvezda T60 on the front page …
********************************************************************************************************************************** Zvezda’s JU 52 Transport (1:200 scale)  I’ve been try to get hold of some of these for a while to give Army Group South some of the lift capacity it might need as they move on from the Rostov operation. Perhaps being 1:200 makes them less sought after but for me that is precisely the size I wanted. I have some die cast DC3s I’ve been using as Lisunovs for the Red Army and my guess at their undefined scale was about ‘one down’ from 1:144. I’m happy to go a scale or two down for aircraft and boats (which are not depicted in the same space as the ground troops) and for ‘heavy lift’, another scale down feels right and has the look I’m after. So I was looking for JU 52s of about the same size when Zvezda announced these (so my fingers were crossed).

JU52s alongside one of the Li-2s
(Matching my size crtieria … the Junkers alongside the die cast ‘DC3’) What is the actual wingspan? Just under 6″ (about 148mm, as you’d expect for a 29.5M wingspan aircraft at 1:200). Review: the model comes in 18 pieces in grey ‘firmish’ soft plastic. The fuselage and wings are solid, and have a reassuringly chunky feel. The parts go together well, without any fiddly issues or breakages. In this respect the model is good and assembles quickly.

18 pieces of nicely cast soft plastic
I will only give it 9 out of 10 as it has the same flimsy propellers and near useless stand that were obvious weak points on the Sturmoviks. Overall, the models look very good however.

a pair of JU 52s after no more than 10 minutes assembly time
There is a bit of a moulding line along the middle of the roof and belly, and some of the detail one might get on larger scale kits is missing, of course (though that does give scope for the super-detailers …)…. I was able to tidy up the moulding lines with a file (as I’ve said, it’s quite a firm plastic), and primed the models quickly in Humbrol matt black enamel before getting on with something else.  That’s the usual ‘quick’ paintjob split into 4 phases (for those who like that sort of thing) … Vallejo grey and green going over the undercoat (with some yellow trimming) … followed by a drybrush in the ‘parchment’ household paint I use for basing (but it was handy and I guessed it would be a good shade) … then I added some decals from the pack without much sophistication (I wanted to get them finished and photographed before bedtime!). The underside was done in parchment tinted with Vallejo blue. The decals do look a lot better than the Russian ones on the Sturmovik and seem to have worked fine.

Zvezda’s 1:200 scale JU 52
I’m very pleased with these. Great little models for £2.50, and very quickly go from kit form to smart enough to resupply cut off German units by air on the Operational Battlefield. I will get some more (it’s 1942) … ********************************************************************************************************************************** Peter Pig’s remodelled BMW Motorcycle combination. I love bikes. And I really enjoy fiddling around with them. Real ones and tiny ones. This is the new version of the classic WW2 BMW. The (standard price) pack comes with 2 models. Each model is in 3 parts: a motorcycle with rider, a sidecar with passenger and a separate head for the passenger (which is cast attached to the front of the sidecar).

2 of these per pack
The head being separate is a nice touch (and normal for PP vehicles which have cast-in crews these days). Quite small heads, by current PP standards. The main difference is that whereas older PP bikes had a lump under the engine casing to hold them up, this has a proper figure base under the wheels. 2 things disappoint, therefore: there isn’t a matching base under the sidecar wheel (which is an interesting idea) – and I’m horrified to see that the lump that used to hold the machine up is still there under the engine (and it is very hard to trim out: ugly, pointless and difficult to remove). An opportunity to clean up was missed. So what else don’t I like? I don’t like the gap between the rider’s arms being solid ( a bit of a ‘PP-ism’), and I don’t like the way the MG lays across the front of the sidecar. Both of these are simplifications to keep the number of parts down and to achieve a strong model. Personally I would have prefered a few more parts to assemble as the price for a more detailed feel to the piece. I generally hack the metal out to free up details of this sort. In this case, other than removing the lump under the engine, I have made one of the two models exactly as supplied. Despite my grumbles it is a splendid little model. The second model I have made up as a parked version of the first. This is quite an extreme conversion, but a whole bundle of fun to do. The rider and passenger are sawn away and a combination of trimming and filing have been used to sculpt/recover the saddle details, the handlebars, the petrol tank and the interior of the sidecar etc.
  (click on the picture and have a look at the bigger version) The MG42 is a Battlefront spare part. It is slightly oversized (no surprise there, then), but just about works – and is a lovely piece in its own right. I would describe this conversion as very advanced as PP‘s standard metal is quite hard, so you need to be adept and careful with your cutting. However, it does all trim back nicely and I really like the results. I knew I would, and it was an enjoyable and worthwhile project. It illustrates the far end of what I would mean by reviewing the model and describing it as full of potential. And indeed that is my reviewing comment: despite a number of grumbles a really nice little model of very few parts which paints up great – but which is capable of considerable modification for those more adventurous collector/modellers. ********************************************************************************************************************************** A couple of ‘Post War’ range QRF vehicles … These are not new but are very nice, a bit fiddly, and you might be interested …

QRF Stalwart model (left) and 1-tonne Land Rover
(parts pic with interior sub-assemblies already made and painted. Apologies to QRF, I missed the Stalwart’s cab top shims off in the photo) QRF refs: PBS04 (Alvis Stalwart) and PBS12 (1-tone Land Rover … ‘101 Forward Control’) The Stalwart has 18 parts so all that detail comes at the price of a fair bit of building. My model had a large amount of unwanted metal in an awkward place under the rear of the load compartment, so although it looks a clean model, it took a half hour of careful filing and trimming to enable the main pieces to fit together. It has six wheels, each free mounting in fairly sloppy sockets. This will give you the opportunity to model the independent wheels climbing over all manner of dramatic terrain. It also means that if, like me, you just want to model the vehicle going straight on the flat, it’s the devil’s job to get them all straight and true and glued at the same time.

QRF Stalwart: stub axles trimmed and glued in
In the end I glued on 3 wheels (2 on 1 side, 1 on the other) so it would sit level, let them set, then glued in the other three wheels with the model sitting on the table and braced them in line with the first lot. It worked. But it’s kind of why it got abandoned in the first place, and I did swear a few times before I got it right.  I do like seeing into the interiors in these QRF range models. As the parts photo shows, you need to introduce a pre painting phase into the assembly to make the most of this feature. Here’s a look into the back of the Land Rover:
 Nice. These air portable Land Rovers were originally designed as gun tows. They remind me of camper vans! Having the tilt and side pieces separate, and with the front part moulded on over the cab looks fine – but as I’m sure you can guess they don’t all quite fit (and those side pieces are just traditional wargame model glue-ons – no lugs and sockets or any of that useful stuff) … After half a dozen goes and some judicious use of the milliput, it all ended up looking good.
  My experience with most wargamer model assemblers, however, is that most of you have a bit less patience than I do and that you will find these two models a bit of a chore. Worth the effort for a bit of variety, of course … And metal not plastic (so pleasingly solid when you pick them up). Annoying to build or not, I like QRF’s Post War models (they are much better than the bulk of the WW2 range). ********************************************************************************************************************************** Peter Pig recent releases – U-boat landing party …
  Just a quick look so you can see what you might get. Martin at Peter Pig has been adding one or two unusual packs to his extensive WW2 ranges. Partisans, U-boat parties, downed pilots etc. and has been circulating a little taster game with the PP Newsletter in which people might like to use them. Above are the U Boat men. The figures on bases with side caps and the Officer are straight from the pack. The man in the boat is a converted paddler in a ‘The Square’ resin dinghy who might be useful in bringing them ashore … and the figure with the comforter cap is a head swap. My pack came with 3 of those submachinegunners, 2 of each type of rifleman and an officer.
  I’m sure you won’t need me to tell you they are great little figures. I’m sure it shows. The heads are a not as overscale as, say, the recent Home Guard figures, which might indicate that Martin is listening to the well-intentioned comments about scale creep that have been made recently.
  Here’s that line up of partisans again. It is a mixture of old (the lady in red) and new partisans (the guys in heavy coats and kneeling sten gunners) and of SCW figures (the guys in pasamontanas, the guy with the neckerchief, the man with the stripey shirt and beret). I think the mix works well, and the extensive range that PP now do for the SCW combined with the new French Resistance means there is an endless variety of armed figures in civilian garb or rudimentary uniforms out of which to make irregular forces. The two ranges match very well.

Left: SCW range in pasamontana; Right: WW2 range French Resistance
I just keep trying not to think about how good the figures would be if Martin finally decided to revamp the WW2 Russians range. Me? I’d go for a Winter War range first … puttees, budenovkas and SVT rifles. Nobody really makes them. And some Finns. ********************************************************************************************************************************** QRF’s NKL-26 Aerosan

QRF Aerosan alongside some PP Russian Infantry
Regular visitors will know that I’m often critical of QRF’s WW2 models: they have a lovely range marred by inaccuracies, poorly fitting intricate parts and odd assembly. The good news is, of course, that QRF do an Aerosan (does anyone else?) and it is a nice, reasonably cleanly cast model. The size seems about right, but there are no instructions with the kit (it has 10 parts, 6 of which are the skis and suspension struts) and the model on the website is not correctly made. It is clear enough from numerous examples that come up on image searches – such as .. … that, for example, the struts stand vertical in side elevation (and are angled out from the body to the skis in the front view), and that the rear struts do not fix onto the cab but on the tube framing around the engine. There are no lugs, pins or whatever to help line these parts up and as cast they need bending to fit (and break when you try to do this – just like you know will happen!). Having completed the model, I will actually go back and make up some additional struts to super-detail it, but in this initial build, I just wanted to build a basic version and see what it looks like.
 And I’m pleased enough to want to go back and do the extra bits (and I’ll add a gunner in all probability). I will also need to fix that ring mount and gun shield (it’s hard to figure why but it just refuses to sit properly – the DT machine gun is nicely done, though). Another word of warning: without holes or pins for any of the parts just plain, metal to metal, mounting, my model fell apart several times over as I tried to get it geometrically symmetrical in all the various angles and sitting down flat on the skis! It looks simple enough when done, but with so many floppy parts needing aligning it is a fiendish little build. I based it on some clear plastic as I have done with the train and boat models, in this case because it is meant to be used on snow and ice, but I think it would look odd if on an all white snowy base unless on a snowscape. This basing is a little more adaptable.
  That said, photographed against a white background it doesn’t really show up (I have put some mounds of snow on the base but they are scarcely visible due to the white on white effect), so here the model is, awaiting the full freeze of the winter snow at a quiet sector of the far North. Yes, I liked this model. It is more fiddly than it should be, and a few concessions to the fact that the wargamer has got to put it together would have been appreciated – but the results are well worth the effort, I think. I’m inspired to get some more of these, as a little raiding party would allow an unusual game (and give those Gebirgsjaeger something to defend against in the depths of a Russian winter) … QRF AEROSAN ********************************************************************************************************************************** Zvezda 1/100 Katyusha model – a quick look

1:100 Katyushas … Zvezda and Flames of War
These are recent additions to the Zvezda 1/100 ‘Art of Tactic’ stable. I got this one in a swap, but you can buy them for around £2.50. They are a very useful addition as decent Katyushas are hard to find. The QRF ones I had I disposed of … they are plain crude. The Battlefront second generation one I have used here is as a comparison is much better but no longer available. That said it took me an entire evening to fit, refit and rebuild the rail assembly to get a nice model. The new Flames of War models are resin tub types, they still have the silly cross-piece under the rails (if there was a cross-piece there, guys, the rockets would hit it and blow the vehicle up!) and are not available singly (so 4 of them + soldiers and a supply truck come in at a mighty £38 … kerching!) So Zvezda’s £2.50 per model, letting you choose any number you want… that’s looking good.

What you get in the box
The model is in green semi-hard plastic of reasonable quality (better quality than many Eastern European 1:72 pukka kits I have had over the years). It comes in 23 parts (10 of which are wheels, so it isn’t really very complex) and fits together nicely. Seriously …. It is a ‘snap together‘ model, and what you see in my photos was snipped off the sprues and did snap together, all in 30 minutes. Although I will go back and glue it, I wanted to test the fit and build and was very impressed. Literally, you can build this entire model faster than you could figure out that the old Battlefront version didn’t actually fit together at all.

Size comparison
Size-wise, as you can see, it is virtually identical to the old Battlefront Katyusha, just – as you’d expect from a plastic kit manufacturer – it is less chunkily detailed. The launch rail assembly is more accurate than Battlefront/Flames of War. Annoyingly, though, only a top layer of rockets are provided (even though a full set is shown on the box art) … There are no stabiliser jacks on the back. Two things really not to like: The characteristic holes are absent from the rails (again, nicely present on the art work – but I think this simplification is what enables the rack to be cast in one piece) and there is a really badly conceived engine hood piece (top and sides cast in a single pice which you have to crack and fold yourself– I’m sure now I’ve mentioned it you can see this on the photos … the one bit that really isn’t quite right). I think this is just bad design – it is clear from the other box type components in the kit that this could have been done properly.

snipped out and snapped together within 30 mins …
Additionally, the cab is made as a closed box (like a solid metal or resin model rather than like a plastic kit). Some will like that … I don’t. When I reassemble the kit with glue, I will have to fix that. Do any of those negatives matter? No, at £2.50, I don’t think they do: this is a great model at a great price. I have inspected a number of the range’s tanks. I like them, but I would still pay the extra for metal or resin/metal hybrids, for the accuracy and durability. In the case of the Katyusha, however, the metal and resin/metal alternatives are not very good as well as being twice the price (or more!). I can also see the models being a very useful base for a number of truck conversions. Take away the rocket launcher unit (which can go on your trains and armoured cutters …) and add any number of custom configurations. I think we’ll be seeing a lot of little Katy … ********************************************************************************************************************************** Autumn Basing: Leaf Litter from Antenociti’s Workshop

Peter Pig Late War Germans (autumn basing with ‘leaf litter’)
I have just finished tidying up some of my Late War Germans (Peter Pig, Late War/Zeltbahn mix: some of Martin Goddard’s best figures), so thought it about time I commented on the basing. I was looking for something slightly chill and wintry … Suitable for campaigns like the Ardennes without actually being snowy (which tends then to look out-of-place in any other environment). I decided to try some of Antenociti’s ‘leaf litter’. On the face of it, it would seem designed for 28mm, and scale-wise is probably about right for 54mm. That said, the eye can be very forgiving, and I think, avoiding some of the bigger pieces, it looks OK. Taken together with the rest of the basing effects and materials, I think it works.
 Re the product, you get a life time’s worth for your money (£4 for the pack back when I invested) – unless you are doing a large diorama. It is quite dry organic matter, so doesn’t actually glue on all that easily. Be prepared for quite a bit to flake off if you just glue and scatter. It’s OK, but it would have been better if it took to PVA a little more willingly! That said, I’m glad I added this to my scenic junk box. For the whole basing effect, I also used some twigs, some Skytrex cargo junk, plus gravel sand and flock:
 I glued down the figures and bulky scenics as usual, then filled around them with basic DIY shop wood filler (a material I use because it’s handy and I sort of get on with it: it isn’t particularly cheap, but I’ve become accustomed to how it behaves and I find it quite quick). I then painted the bases with a mud and ash effect, added flock, sand and leaf litter, then dry brushed. That didn’t really work, as a fair bit of leaf litter came off when I dry brushed anywhere near it, so there was an extra ‘end’ phase, glueing more leaf litter. As a process, it fits together like this:
 So, autumn effects with ‘leaf litter’ from Antenociti’s Workshop? Yes, it gets a qualified thumbs up. Qualified, because although the effect is exactly what I want, it is a bit fiddly. But I can’t see a better way, so I am pleased. Not all basing effects are completely simple.
 ********************************************************************************************************************************** 15mm WW2 JEEPS
 Whilst I’m updating the reviews page, I thought I’d just add in some jeeps. I happen to have some PP and some FOW on the table at the same time, and, if you wanted to know which to buy, the ‘side-by-side’ is interesting. A basic empty PP costs about £3, a triple pack of FOW about £8.50 … so there’s not much in it on price. The PP is, of course, all metal, the FOW the usual resin tub with cast metal details to fix on. The key difference is that PP offer you all the bits – except the wheels – already fixed on (and lots of variants to choose from), FOW lets you create the variations yourself, by choosing which bits you want to have. The exact pack configuration shown is not on the current FOW listing (I think the ‘3 for £8.50′ doesn’t have the extra passenger or both MGs). It does have the ’tilt up’ option, which is its big advantage (although I suspect ’tilt down’ is the wargames norm).
  The PP jeep is a lovely model, but if you want it crewed, you will have to buy one of the crewed variants (generally £4, rather than £3) or buy some seated packs to crew it. I can see why some people view PP as more expensive (FOW vehicle packs usually give you at least some crew figures and/or weapons options). Then again, the PP approach gives you a more durable finished model … Beneath the added stowage etc. a quick measure up shows the two jeeps to be the same size. The PP model has bigger wheels, however, so sits up on the table more chunkily (as it were) …
  I have filled the PP vehicle out with some added crew and a Maksim in the back – I was actually sorting out these jeeps in order to get the bits together for an NKVD patrol. Really, there isn’t much in it between the very different approaches. If you want lots of stowage, ready done, then the PP options (and there are a lot of them) are for you. If you want basic jeeps, ‘straight out of the crate’, as transport markers, then FOW will do you a more basic model, and, being resin, it will be a little cheaper.

NKVD Patrol Jeep from PP components
***********************************************************************************************************************************  SOVIET STORM: WW2 IN THE EAST (The Military History Channel, weekdays 8pm) This reviews page is almost entirely devoted to figures and vehicles, but I have been watching Soviet Storm on the Military History channel over the last week or so, and it has some merit. It is a Russian made documentary series, and includes previously unseen archive material (though, of course, much of it is familiar). It is a mixture of the best and worst of imports. A lot of the visual material is a clever meshing of reenactment with CGI … it looks quite good at the moment but one senses that it will date very quickly. The information captions are translated into English – but, disappointingly, the maps are not. These are mostly ‘broad sweeping arrows’ type maps, so probably tell us nothing new (but it would be nice to be able to tell)… That said, it does give the story from the Soviet point of view, and it interesting to hear of the frustration on the Russian side at Kursk as the German Offensive was endlessly postponed, or to be narrated the stats on the 4,000 rail deliveries for Operation Bagration. Indeed, there is a very informative description of the preparations and disciplines of concealment used in building up for the attack on Army Group Centre that is generally not covered in ‘western’ perspectives. Worth viewing just for that … Find it on Military History (episode guide) at 8 (or if like all good middle-aged wargamers, you are in the gym at that time of the evening, tape it or catch the repeat!) … *********************************************************************************************************************************** Battlefront Tiger I E (Zimmerit) … ‘Flames of War’
 Not a new item to the market … but I’ve not had a Tiger in 15mm before (a bit ‘high tech’ for the Not Quite Mechanised war I find more interesting … but never say ‘never’). This one turned up unbuilt at half price in a rummage box on the Phalanx Bring & Buy – I’d gone … so I bought. I’ve not featured FoW/Battlefront on this page before, so I thought I’d describe the model. Anybody who reads these pages ought to be able to tell that I favour PP infantry, but find their range of vehicles a bit limited and sometimes feel the chunkiness is overdone. Especially some tank gun barrels, for example. Good examples from QRF’s highly variable range are good, but almost none are sufficiently accurate to be usable (to my prefered standard) without significant adjustment. CD/Skytrex are a nice compromise .. some are a bit spartan. Quality Castings are the tops for quality, but can be a little on the small size (and you need to get them from the States, which can be a pain). The new Zvezda plastics are small, and a tad plasticky … The best Battlefront resin/metal hybrids are very good indeed.

The ‘Flames of War’ Tiger I
The Tiger comes in 6 basic parts … a resin hull, a resin turret, 2 chunky metal track components, a metal gun and a metal commanders’ cupola. Add in the hull MG, hatches etc. and it’s 11 (I list them separately as the hatches don’t really require assembly in the painful sense … they are just drop in components cast separately so you can model the vehicle with hatches open or closed). The ‘kit’ comes with crew figure busts (should you want heads sticking out) and with ‘open versions’ of the driver/MG hatches with the interior side modelled. Full marks for this latter feature – nice for the designer to have taken the trouble. Also nice, the cupola comes as (2, separate, complete) open or closed versions – this could have been done just by allowing a glue on hatch, but the nice people at Battlefront have clearly decided to spare us the pain of incorrect fixing and broken off hatches by doing the work for us.

Battlefront Tiger I E: some crew added and hatches open
Less good (we are now up to 14 parts if you use one of the heads, fix on that funny part on the rear and use the spare track …) … the mud guards come in 6 pieces, and don’t really have any receiving flats or pegs to locate them onto. I had about 3 or 4 goes at getting them exactly right, which didn’t get full marks (and I’m generally thought of as fairly skilled and patient – so I suspect there may be quite a few of these Tigers out there in gamer-land sans mud guards ..).. Still nothing like making up a QC 8 Rad … but I was getting bored with glueing bits on. Meanwhile, back with the general review. As with many such examples, the track components don’t mate well with the hull. Neither surface was flat, and there were some bubbles on the resin. I like to use superglue rather than ‘blobs of miliput’ (PP‘s recommended method), so had to file away at all the mating faces to get a surface that would stick for long enough to (then) smooth some filler in underneath. Pegs cast on the tracks and holes in the resin tub would really improve this (and make a stronger model that went together quicker). For show, I added a (floor brush) aerial and made the turret magnetic/moveable … I use a disc of magnabase and a disc of biscuit-tin rather than rare earth magnets (it is not as grippy a solution, but works, and I have plenty of both. There is no polarity to worry about) … The model is fixed on a base, and, for Battlefront chic, I even fixed a Silfor tuft on it. I used the black undercoat method as shown on the Humvee review below. As usual with Battlefront stuff, the paint goes on fine, with no discernible difference between the resin and the metal. I mostly used dry brushing as I wanted the zimmerit effect to show up nicely. I think it has come out well … Actually I am rather pleased with this big cat. For Operational games, I can now add in a Schwer Abteilung for 1943 onwards. Or it can just sit in the box to tease Will (as he’ll discover the scenario is too early and he won’t be allowed to use it!).

Lurking in the Hedgerows
A good model that went together well after an initial session filing down the components. Full marks for the hatches and cupolas … negative marks for the fiddly mud guards with no rebates to stick them on. The resin gives it that chunky feel that could almost be metal. All in all a good looking model that gains more plusses than minuses. ***********************************************************************************************************************************  15/20mm Barbed Wired Just a quick review/comment … I picked a little pack of (lighting wire) ‘Barbed Wired’ up from Under the Bed Enterprises whilst at Partizan. Given some commercial wires can be expensive, in the past I have made my own by twisting 5amp fuse wire together. However, I’m not sure I need to with this stuff priced at £1 for 2 metres. I’m sure that’s a horrendous price for what’s really in the bag … but for me 2 metres of the wire ready to use looks like saving me well over £1 worth of boring wire twisting. The pack doesn’t feature on their web page at the moment (Under the Bed) – so maybe you’ll have to catch up with them at a show – but the EQ range of boxes and stowage is also worth noting … suitable for 15 and 20 mm scales IMO, I have used some of the ammo boxes for litter and for stores markers. Here’s a quick picture of the raw wire with some Soviet infantry guns filing past. As you can see, it’ll be good denoting minefields and fortifications and will look fine with most of the main wargames scales.

Barbed Wire from UTB
UTB Wire (twisted into a spiral around a pen barrel, of course …)… If you want to super detail with barbs, you can use blobs of glue or similar spackling, but I’m not sure you need to go to that level …

StuG battalion dug in behind some hand twisted wire
Here’s a picture of some of my hand twisted wire which has had some barbs applied. I can’t even see them any more! So it’s probably worth doing, but just at the final pass, when finishing bases, dry brushing and the like. No barbs, then, but I like this wire – both the convenience and the price. Recommended … you should be able to make up fortifications, minefields and similar markers quite quickly at a reasonable cost. ***********************************************************************************************************************************

New from PP
Some new stuff from Peter Pig Although a lot of Peter Pig’s recent output has been ACW and AWI, some long-awaited releases of interest to the 20th century enthusiast have been added to existing ranges. Of interest to AK47, the Humvees have arrived … and although they might not be items that make a big splash, I was someone who had long lobbied to add Soviet Ushankas to the separate heads range. Humvee The Humvee is an excellent addition to the modern vehicles, and comes as a solid bodied kit with a hole in the roof to take the armament. The armament is designed to be interchangeable, and you can buy ‘3 packs’ of the various MG/missile armaments to slot in (and/or use to adapt other vehicles): this interchangeability is part of the design idea.

What you get in the packet
In the picture, I have snapped what you get, ready for me to assemble. I like ‘see through’ shell type bodies, so have hollowed it out a little and removed the windows etc. There is no need to do this (it just suits the rest of my collection for me to do so) – follow this link if you want to follow the process (super detailing). Note that the kit comes with a modern US head – I have substituted a kepi one because the vehicle is likely to bolster up the Canadian peace-keepers.

adapting the gunner
Of course, being able to see through the windows means I’ll need to graft some legs on the barrel of the armaments ‘plug in’. And cut a piece of card to blank off the vehicle floor … and prepaint before assembly.  All easy stuff of course – and you can skip these phases if you go for the standard PP solid model. It is a well made model, and fits together well. I like it, and the scale and presence of the model is very pleasing. To finish, these days I use a black undercoat with a mix of acrylic and enamel tops and dry brushings to get the desired finish.

some stages of the finish
Here are some of the stages edited together. The aerial is bristle snipped from a cheap brush.

Peter Pig Humvee
Finished and ready to add to the vehicle reserve. I was very pleased with all aspects of the Humvee. Recommended  (Humvee and some new friends) Ushankas Notionally, these are great. I’m surprised they weren’t amongst the earliest addition to PP’s very useful range of spare heads as the ‘fish fur’ Ushanka was near universal from ’42 onwards, but the Russian WW2 range only has a few examples. Post WW2 it is great for Korea and Warsaw Pact and is still in use today. So extremely useful. Now, without wanting to stir anything up, the best I can say is that I was disappointed that these were not a more traditional 15mm scale. Heads have been getting bigger in PP’s ranges … but … well, while I wouldn’t say these are not 15mm scale, the following comparison shot shows how they match between plastic 20mm and existing PP Russian 15mm.
  They are quite nicely done (though the ones on existing figures have a badge on the front, while these do not. The badge is a feature of the hat, so it would have been nice if the feature had been retained) … however, they won’t match with existing PP Red Army figures – you can’t really use them to add variety, you have to replace the heads of all the figures on a stand (really all the figures in a unit) .. That said, with everyone big-headed, it doesn’t look to bad.

Leningrad Militia
These are some spare RCW figures decapped and made up into Leningrad Militia.  (Close Up) Well … I’ll concede it isn’t quite to my taste (they do remind me a bit of those Eureka ‘teddy bear’ soldiers), but you can get away with it. They are some of the biggest heads I have seen to date. So, a universal thumbs up to the Humvees, a more guarded welcome to the new heads. Not suitable to upgrade and adapt existing figures, but perhaps useful to do whole units based around chunky originals (and probably brilliant for 20mm collectors who want to do some conversions) … Check they will give the look you want before buying too many. ********************************************************************************************************************************
  Forged in Battle‘s German 88. I came across this new 15mm WW2 range at Partizan. Looking at the assembled exhibits and squinting through the plastic box, the quality looked good enough, so as don’t have an 88 for 22nd Panzer Div, I thought I’d get a pack and see what’s what. The website has a catalogue (here … ) The set comes as 2 guns each with 8 crew figures and Sdkfz 7 tractor.

Forged in Battle’s Flak 36
The price was £18, which I thought was pretty good – translating to £9.00 for each gun/crew/tractor group. This compared favourably with say a Skytrex 88 @ £6, or in a pack with crew and tow for £10 (less for a QRF gun pack but the quality is not good). Of course the downside is that the tow is a ‘Flames of War’ style resin block model. So it will all come down to how good the modelling is and how well they make up. Gun and Crew Casting: I rejected the first pack I picked off the rack as one of the transit bogey units was not crisply cast (hub and tyre detail blurred) – and in truth, one of the four in the pack I did choose was not quite 100% (less obvious than the reject, but simply not 100%). I have noted this to West Wind but clearly there is a problem of some sort with that bit of the mould. Otherwise all was good and crisp. The model itself is very good. Well sculpted. The cruciform base comes with separate stabilizers so it can be assembled open or packed up. The nice clean model you see in the accompanying photos has not needed to be tidied up with any knife or file work. With the exception of nasty mudguard ends on one part of the bogies, the model is almost perfect to paint straight out of the box.  It is worth noting that the gun is cast level in its cradle, so cannot be modelled elevated as is often possible with this gun. At least, not without a lot of knife work. Thankfully I had not imagined assembling it in AA mode (but it is another limitation). Crew: the crew figures are excellent. Absolutely standard in size, comparable with FoW, Piggies, Skytrex, and those few Quality Castings I have been able to get hold of. Anatomically much nicer than, say, the current crop of FoW (see the pictures)

size comparison
The officer’s cap is one of the best I have seen in this scale. He will make an excellent commander. Indeed, a very pleasing bunch, and it is nice to see a figure without his tunic (if not actually stripped to the waist) – middle figure below, of course ….

Forged in Battle Flak crew
Yes, most of them are doing what gun crew usually do (standing around), but this lot look fairly convincing at it. You can see they paint up well. The above is just a black undercoat with Field Grey base plus lightened drybrushing. Citadel flesh with (brush applied) magic dip. Rough and ready, but the sculpting of uniform detail is good. Not at all clumsy but just raised enough to pick up the drybrushing as shown. Assembly: The next headache was that I had decided to model the gun firing from the transit position. Quite surprising first time you see it, this is shown quite often – and is ideal if you intend the model to be used both being towed and as firing. Unfortunately, no way could I get it to look right. There is just nothing like enough rebate on the underside of the bogies to lift the base up into a convincing transit position (as bought, the base ends up only a millimetre or two off the ground). I had to trim away quite a lot of the metal to get it up to the mid-wheel height shown in all the photographic sources. Again, the company pictures do not show the gun in transit mode, but given all the components are there, and that it is an obvious use to put them to, that it does not assemble nicely that way is an own goal, really.

FiB’s 88 assembled up for transit
There are some more limitations. Although clearly intended for assembly in the firing mode, the model comes with no seated gunner .. so I had to fit one in from a spare seated Peter Pig driver figure … I could have spent longer on this addition but I was getting a little impatient and I think it looks OK.

ersatz gunner from my odds and sods box
Now don’t think I inserted a figure from a different marque just to be cantankerous. Surprisingly, there are no seated figures in the set at all, as the Sdkfz 7 comes completely empty, not even with a driver. One can only assume this is a model dedicated to the Flames of War (and similar?) market … it is an anti-tank 88 supplied to be modelled firing over level sights with an empty tractor present with the sidelined bogies as a ‘transport marker’. It isn’t designed to be shown shooting at aircraft. It isn’t designed to be used – say, as I intended, in an operational game – mostly being towed. Anyway, I have some spare Skytrex lorry figures so I can fix seated figures omission too.

FiB 88 part way through painting
See, it is starting to look good. Finishing: I deliberately used only a drip of superglue fixing the gun to the base during primary assembly so I could break the joint for ease of painting (especially as I had chosen to have a cluster of figures all round it, standing on the base). I used a black Humbrol undercoat, followed by Vallejo German Grey and lighter drybrushing. Plus the separately painted crew were fixed on. In the final picture, I have added some foliage and netting camo, a few more colours on the crew, and a bit more highlight.

This might come as a nasty surprise to unsuspecting tankies!
Although there have been a lot of gripes here (casting issues with the bogies, no choice on elevation, no gunner, no figures to go in the Sdkfz 7, poor adaptability to transit mode etc.) … this project has nonetheless been a pleasure so far … Because the model itself is fine and a joy to work with. It is clean and smooth to paint, and I think rewards the effort by looking great at every stage (you never feel you are wasting your time with it). It’s just a pity I have to say if you want an AA gun, or a model being towed down the road, you are better off looking at, say, the Skytrex options. Next up, I’ll have a look at the tractor.

Painting the Sdkfz 7
There was no clean up or preparation required before painting the model, and it takes the paint as well as any other resin models (better than some). The detail is crisp and accurate, and nothing was broken off in the pack (which sometimes happens with resin items). The paint job above was a standard black undercoat with shades of Tank Grey over as used on the gun. The results are perfectly acceptable and pretty quick. It is a good model. It isn’t really the model for me – even if the whole model is not to be metal, I like at least to see under it, and have, say, metal track units (which always look good with a gunmetal wash) … and I base all my vehicles (of course), so prefer to fix my own base, which I can then texture in to suit the theatre and other parts of the force being modelled. I’ll be putting some crew in first, but in the fullness of time, I will almost certainly hack the base off this model and fix it on something more appropriate. So, a very nicely sculpted set, cleanly presented and straightforward to paint. And good value. Not really the model for me, it is a little too specifically targeted to just one of the ways the 15mm WW2 enthusiast might want to use it. Funny, that, in a way: the people who would most like this set are the people most tribally loyal to the brand they currently buy.


Dear Phil,
If you still have one of the original German 20mm plastic Airfix models it would be fascinating to compare them.
If I had hung on to them for long enough, I could probably now use them as 15mm :O)
hmm …
FiB 15mm 88, length incl recoil slide 50mm
Airfix 1:76 88, length incl recoil slide 72mm
No real scale creep there (if the 15mm was a 1:100 ratio to the 1:76 Airfix model, it ought to be 54mm overall, according to my maths – 52mm if the Airfix was 1:72)…
One of the joys of 15mm is that (save the heads and extremities in too many cases) it has remained fairly true – certainly if compared to that odd scale that notionally fits between 20mm and 30mm. I think the link to scale model vehicles helps keep things sensible …
Thanks Phil, I was thinking more of the German officer figure though. Do you remember the one giving half a wave, half a salute? I think that the current crop of 15mm pumpkin heads are actually 20mm true scale figures with drastic surgery removing bits of their tibias, fibulas and other essential bonework :O)
Oh OK I get it … The old HO-OO issue. I still have some of those really old Airfix nondescript British infantry that were the HO (1:87) end of the HO-OO scale. Really small. You are right – I might be able to recycle some of them as 15mm with some of all those spare heads I have got. Modern 15mm heads are definitely bigger than the old HO sized Airfix heads (I’m tempted to put some original German Infantry heads on some spare 15s for a jape … and see if anyone notices) .. Watch this space …
[…] Reviews […]
As I think you both know I have both Airfix Germans and Airfix 88’s if I can be of any help.
As the Ushanka heads reviewed above I think demonstrate, Will … old Airfix will be too small for modern 15s 🙂
Phil
Ushankas at last! Urrah!!
Pumpkin heads, Martin what were you thinking? Scale creep led me to adopt 15mm in the first place, so I may have to look at armies in plastic to keep head sizes down :O(
[…] Reviews […]
[…] Reviews […]
[…] Reviews […]
[…] Reviews […]
[…] this in mind, I started to trawl and read some very encouraging reviews in Wargaming in the Mechanised Age and Military Modelling about Zvezda’s July 2011 release of a BM-13 Katyusha in […]
[…] Reviews […]
[…] Reviews […]
[…] Reviews […]
[…] Reviews […]
[…] Reviews […]
[…] Reviews […]
[…] Reviews […]
[…] Reviews […]
[…] Reviews […]
[…] Reviews […]
[…] Reviews […]
[…] Reviews […]
[…] Reviews […]
[…] Reviews […]
Brilliant site mate.
[…] Reviews […]
[…] Reviews […]
[…] Reviews […]
[…] Reviews […]
[…] Reviews […]
[…] can just live with the stupidly wide handlebars and too-short wheelbase. Peter Pig does it better on this one, in my opinion, but QRF just pips it for composition. See also YesthatPhil’s review on his […]
[…] Reviews […]
[…] Reviews […]
[…] Reviews […]